Standing 20 feet above a cold driveway on a piece of weathered GRP isn’t a hobby; it’s a high-stakes aerial performance. Most DIYers treat their roof like a garden patio, but the Health and Safety Executive (HSE) 2024 report shows that falls from height cause 35% of all fatal workplace injuries in the UK. You’re right to feel that spike of adrenaline. Brittle asbestos and complex harness systems can kill the vibe of any project. You need the right gear for safe roof repairs to turn that uncertainty into total impact.
We’re here to disrupt the “just be careful” narrative. This guide promises to arm you with the high-performance safety gear and professional tactics you need to conquer your roof without the risk. We’ll break down the 2026 standards for harness systems, show you how to navigate fragile sheets, and give you the street-smart edge to finish the job safely. It’s time to stop stalling and start making noise on your own terms. Let’s go for it.
Key Takeaways
- Stop playing games with gravity by ditching basic belts for high-performance fall arrest systems that keep you locked to the structure.
- Master the essential gear for safe roof repairs to dominate complex DIY projects with total confidence and professional-grade control.
- Navigate fragile UK roofing materials like asbestos or GRP using crawling boards to distribute weight and eliminate the risk of a breakthrough.
- Level up your PPE kit with specialized restoration gear designed to handle chemical hazards and intense physical work without breaking a sweat.
- Execute a flawless pre-flight safety audit and lock in the buddy system to ensure every high-altitude mission is a total win.
Why Safe Roof Repair Gear is Your Ultimate DIY Power Move
Stop viewing safety gear as a “just in case” chore. It is your tactical advantage. When you are 5 metres up, gravity is the only player on the field that never misses. Owning the right gear for safe roof repairs isn’t about fear. It is about total dominance of your workspace. You aren’t just “being careful.” You are building a fortress of confidence. Professionalism starts with the kit. When your feet are locked and your harness is snug, you stop worrying about the pavement. You start focusing on the craft. This is how you disrupt the “clumsy amateur” narrative and execute like a pro.
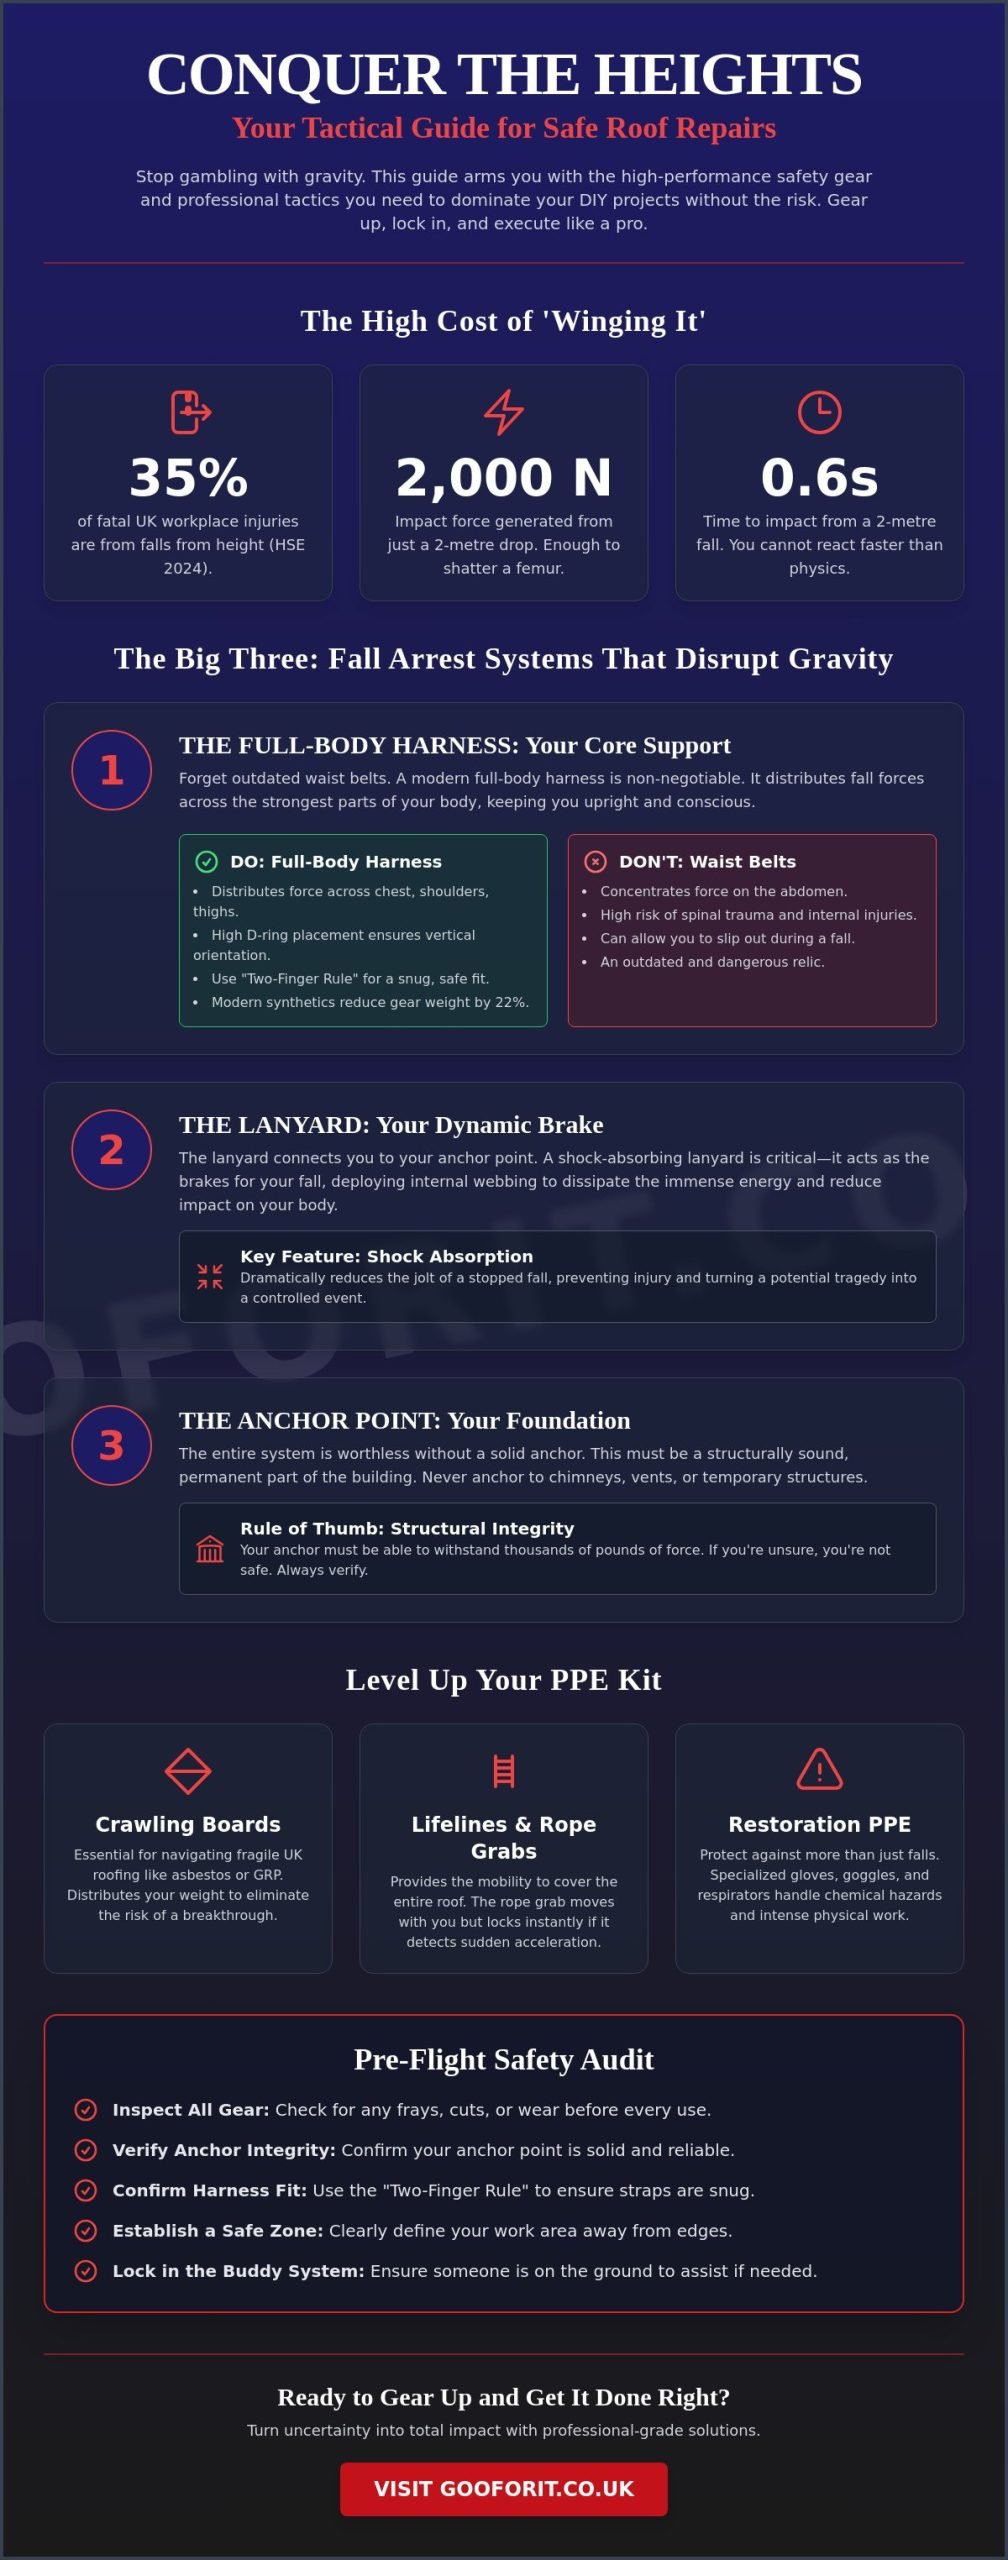
The high cost of “winging it” is a gamble you will eventually lose. Gravity does not care about your 15 years of DIY experience or your steady hands. It only cares about mass and acceleration. By defining a clear “Safe Zone,” you separate the winners from the statistics. This involves understanding the line between fall prevention, which keeps you away from the edge, and fall arrest, which saves your life if you slip. Gear up. Lock in. Take control.
The Physics of a Fall: Why Seconds Matter
Let’s talk raw data. Falling just 2 metres generates nearly 2,000 Newtons of force on impact. That is enough energy to shatter a femur in less than 0.6 seconds. You cannot react faster than physics. A “fall arrest” is the specific system designed to stop a fall already in progress. Integrating high-spec fall protection systems into your workflow turns a potential tragedy into a minor inconvenience. This safety net provides the psychological edge needed to apply your GRP roof restoration coating with surgical precision. No shakes. No hesitation. Just high-impact results.
Legal and Insurance Vibes: What You Need to Know
UK law is specific about height safety. While the Health and Safety at Work Act 1974 primarily targets professionals, UK homeowners still carry a “duty of care” for anyone on their property. Negligence is a massive vibe killer. If an accident occurs and you lack the proper gear for safe roof repairs, your home insurance provider may scrutinise the claim. Most UK policies require “reasonable care” to be taken during maintenance. DIY freedom is not a license to ignore basic survival logic. Proper gear protects your health and your financial peace of mind. Secure the kit. Protect the payout. Go for it with zero regrets.
- Impact Force: 2,000 Newtons from a 2-metre drop.
- Reaction Time: 0.6 seconds to impact.
- Compliance: Aligning with UK duty of care standards.
- Insurance: Avoiding “negligence” clauses in standard policies.
The Big Three: Fall Arrest Systems That Disrupt Gravity
Gravity is a constant. It doesn’t care about your DIY ambitions or your weekend schedule. To survive the heights, you need gear for safe roof repairs that actually performs under pressure. We’re moving past the era of “being careful” and into the era of total system reliability. The Big Three components are your harness, your lanyard, and your anchor. If one fails, they all fail.
Forget the old-school waist belts. They are relics of a dangerous past. In a fall, a simple belt can cause severe spinal trauma or internal organ damage. Modern full-body harnesses are designed to disrupt that impact. They distribute the force across your chest, shoulders, and thighs. This keeps you upright and conscious if the worst happens. It is about making noise with your safety standards, not your landing.
- Shock-absorbing lanyards: These act as the “brakes” of your safety rig. They contain an internal webbing that expands during a fall to dissipate energy.
- Lifelines and rope grabs: These provide the mobility you need to reach every corner of the roof. The rope grab follows you as you move but locks instantly if it detects a sudden acceleration.
Choosing the Right Harness: Comfort Meets Impact
A harness only works if you actually wear it. Look for D-ring placement that sits high between your shoulder blades. This ensures you remain vertical during a fall. High-end models now feature breathable, padded leg straps. This is vital for 2026 DIYers who might spend four to six hours on a pitch. Comfort isn’t a luxury; it’s a focus tool.
Test your fit using the “two-finger rule.” Slide two fingers under the leg strap. If they fit snugly, you’re set. If there is a gap, you risk slipping out of the gear mid-air. Since 2023, lightweight synthetic polymers have disrupted the market. These materials have reduced total gear weight by 22%, meaning you can move faster and stay on the roof longer without fatigue.
Anchoring for Success: Finding the Solid Noise
Your anchor is the silent hero of the entire operation. It is the only thing connecting you to the house. Never attach an anchor to a gutter or a chimney. You need to identify structural points, typically the rafters or the ridge beam. A temporary anchor, which usually costs between £40 and £85, is perfect for a weekend project. Permanent anchors are better if you plan on doing yearly maintenance, as they stay fixed to the structure under the ridge caps.
Positioning is everything. You must avoid the “pendulum effect.” If you set your anchor at one end of the roof and work at the other, a fall will cause you to swing like a wrecking ball. This swing often results in hitting the ground or a wall anyway. Stay within a 15-degree angle of your anchor point at all times. For a deep dive into load requirements and placement, check the OSHA roofing safety guidelines to ensure your setup can hold the required 2,267kg of force.
Don’t settle for “good enough” when you’re six metres up. If you want to master your home maintenance without the fear, go for it and invest in a pro-grade kit before you climb that ladder.
PPE for Restoration: Protecting Against More Than Just Falls
Gravity is the obvious enemy. It’s the one everyone fears. But when you’re high up, the silent threats are just as lethal. We’re talking about the microscopic dust and the aggressive chemical fumes that come with serious restoration. You need the right gear for safe roof repairs to handle the physical and chemical chaos. If you’re diving into asbestos roof repair, a basic harness isn’t enough. You’re entering a combat zone of fibres and toxins.
Eye protection is another failure point for most DIYers. Cheap goggles fog up the second your heart rate climbs. Being blind on a pitched roof is a fast track to a disaster. Invest in dual-vented, anti-fog eyewear. It stays clear when the work gets intense. You need to see every crack and every slip hazard with total clarity. This isn’t just about safety; it’s about maintaining the vibe of a professional who knows exactly what they’re doing.
Respiratory Protection for Coatings and Kits
Don’t breathe in the noise. Standard paper masks are for hobbyists. When you’re deploying asbestos roof repair kits, P3 filters are the industry benchmark. They filter out 99.95% of particulates, keeping those lethal fibres out of your system. If your project involves GRP resins or liquid membranes, you need organic vapour cartridges. These canisters neutralise the heavy chemical fumes before they reach your lungs. Encapsulation is the process of sealing fibres safely.
Hand and Foot Mastery: The Contact Points
Your old trainers are a total liability. They lack the surface area and the compound density to grip a pitched roof. Professional-grade footwear uses soft-compound rubber soles designed for maximum friction. It’s about sticking to the surface, not sliding off it. You can check out professional roofing safety standards to see how the pros prioritise grip on every single job. This footwear choice isn’t just a suggestion; it’s the foundation of your stability.
Your hands need the same level of respect. Forget latex. It’s too thin and dissolves when it touches waterproofing solvents. Nitrile is the winner here. It’s chemical-resistant and tough as nails. High-quality nitrile gloves allow for high-impact precision with SpeedPatch repairs, ensuring you can feel the material without exposing your skin to corrosive resins. This is the gear for safe roof repairs that separates the legends from the amateurs. Go for it.
Navigating Fragile Surfaces: Gear for Asbestos and GRP
Stop. Look. Listen. That roof under your boots isn’t a pavement. It’s a potential trapdoor. Older GRP and asbestos cement sheets are notorious for “invisible” fragility. They look solid. They feel firm. Then they snap. Spotting these hazards early is your first win. Look for hairline cracks or moss growth that hides brittle patches. If the material is grey, corrugated, and installed before the UK asbestos ban in 1999, treat it like thin glass. According to HSE data, falls through fragile materials account for 22% of all fatal falls in the construction industry. Don’t be a statistic.
The Fragile Roof Protocol
Never step directly on fixings. Never step in the center of a sheet. You need to bridge the gap. Use crawling boards, also known as duckboards. These are the ultimate gear for safe roof repairs because they spread your weight across the structural purlins. If you’re tackling a fibreglass roof repair on an aged deck, remember that UV damage makes GRP brittle over time. Use staging boards to create a stable base for your repair kit. It’s about weight distribution, not luck. Keep your movements fluid and your weight centered.
- Crawling Boards: Essential for spanning at least three purlins.
- Roof Ladders: Use these to reach the ridge without putting pressure on the sheets.
- Staging: Creates a “work zone” that prevents you from stepping onto unknown territory.
Ladders and Access: The First 10 Feet
Gravity doesn’t negotiate. Most accidents happen in the first 10 feet of the climb. Get a ladder stabilizer. It stops the sideways slide that sends DIYers to A&E. Tie off your ladder at the top using a heavy duty ratchet strap. It takes 60 seconds. It saves your life. Follow the 3-point contact rule at all times. Two hands and one foot, or two feet and one hand. Always keep your belt buckle between the stiles. Don’t overreach. If you can’t reach the work comfortably, climb down and move the ladder. It’s a simple rhythm that keeps the vibe high and the danger low.
Preparation isn’t just about having the right tools; it’s about the mindset of total site control. When you use the right gear for safe roof repairs, you eliminate the guesswork. You turn a high-stakes gamble into a calculated win. You’re here to disrupt the leak, not your own health. Own the height. Control the surface. Make some noise with your results, not your fall.
Go for it and secure your workspace before you start the job.
The Final Safety Audit: Build Your Kit and Go For It
Stop. Don’t climb yet. You need a final audit to ensure your gear for safe roof repairs is ready for the 2026 season. Inspect every centimetre of your equipment. Look for frayed webbing on your harness. Check for hairline cracks in your carabiners. If a buckle rattles or feels loose, replace it immediately. Noise is a distraction you don’t need when you’re 6 metres above the driveway. A silent kit is a secure kit. Every piece of hardware must function with precision to maintain the high-octane pace of a successful DIY fix.
The buddy system is your lifeline. Never go top-side alone. Statistics from the UK Health and Safety Executive consistently show that having a ground-level partner reduces response times during incidents by 50%. Your partner isn’t just there to watch; they secure the ladder base, monitor your tether, and keep the perimeter clear of pets or pedestrians. They are your eyes on the ground. If the vibe shifts from a routine repair to a risky situation, they are the ones who call 999 while you stay focused on staying attached to the structure.
Weather monitoring in the UK requires a tactical approach. A 20mph gust can turn a simple piece of flashing into a dangerous sail. Use a hyper-local weather app to track wind speeds and precipitation in real-time. If the clouds look heavy or the wind starts to whistle through the eaves, stay grounded. Dry tiles provide the friction you need; wet ones are a recipe for disaster. You have the gear for safe roof repairs, so wait for the right window to use it. When the sky clears, you execute.
Organizing the Noise: Tool Belts and Buckets
Hands-free is the only way to climb. If you’re gripping a hammer while ascending a ladder, you’re doing it wrong. Use a heavy-duty tool belt to distribute weight across your hips. Gravity is relentless, so use tethered tool lanyards for every piece of kit. This prevents a 500g hammer from becoming a lethal projectile if it slips your grip. Keep your SpeedPatches and liquid coatings in a secure, bucket-style organiser that clips directly to your harness or the ladder. Accessibility creates speed, and speed limits your exposure to high-altitude risks. Keep your workspace tight and your tools closer.
Emergency Readiness: The Plan You Hope to Never Use
The self-rescue vibe is about being bulletproof. If you fall and your harness catches you, the clock starts ticking. You have roughly 15 minutes to be rescued before suspension trauma becomes a critical medical emergency. Carry relief straps on your harness to allow your legs to push off and maintain circulation. Your rooftop first aid kit must be more than just a box of plasters. It needs trauma gauze, antiseptic wipes, and heavy-duty shears. This isn’t about being paranoid; it’s about being a pro-level operator who respects the height. Disrupt the leaks and dominate the repair with total confidence.
Ready to disrupt those leaks? Grab your pro-grade repair kit and Go For It!
Own the Sky: Your Roof, Your Rules
You have the blueprint. Gravity isn’t the boss; you are. By mastering fall arrest systems and locking down your PPE for hazardous surfaces like asbestos, you’re not just fixing a leak. You’re executing a high-impact mission. The 2026 safety landscape demands zero compromise. You need the right gear for safe roof repairs to move with total confidence across every tile and sheet. This isn’t just maintenance; it’s a statement of DIY dominance that protects your home and your health.
Don’t settle for “good enough” when the UK HSE Working at Height Regulations 2005 set the bar for survival. We provide specialist coatings engineered specifically for GRP and asbestos surfaces, ensuring your repairs survive the next 15 years of relentless British rain. Our high-performance DIY kits are designed for long-term protection, backed by UK-based expert guidance that cuts through the noise. It’s time to stop overthinking and start doing. You’ve got the skills. We’ve got the tech. Let’s make it happen right now.
Stop the leaks and Go For It with our high-impact repair kits!
The roof is waiting. Grab your kit, check your harness, and show that leak who’s in charge. You’re ready to disrupt the status quo and win.
Frequently Asked Questions
Is it illegal to work on my own roof without scaffolding in the UK?
No law prevents you from working on your own home without scaffolding, but you must follow the spirit of the Work at Height Regulations 2005. While professionals must use scaffolding for almost all jobs over two metres, DIYers often skip it to save money. This is a massive risk. If you fall, the consequences are permanent. Most UK safety experts recommend hiring a mobile tower for roughly £250 per week to keep the vibe safe and stable.
Do I really need a full-body harness for a single-storey flat roof repair?
You definitely need a harness because 19% of fatal falls in the UK occur from heights of less than two metres according to HSE 2023 data. Gravity doesn’t care if you are on a bungalow or a skyscraper. Using the right gear for safe roof repairs means clipping into a certified anchor point every time. It’s about total impact protection. Don’t risk a life-changing injury for a quick patch job. Go for it with the right protection.
What is the best footwear for walking on a slippery or wet roof?
Choose boots with deep-tread nitrile rubber outsoles for maximum friction on damp surfaces. Look for a slip resistance rating of SRA or SRB under the EN ISO 20345 standard to ensure the grip is verified. Avoid hard plastic soles as they turn into skates on wet slate. Your boots are your primary connection to the structure. Investing in high-grip footwear creates a stable foundation for every move you make up there.
How do I safely inspect an asbestos roof without breathing in harmful fibres?
Never touch or scrape the surface of any roof built before 1999 as there is a 50% chance it contains chrysotile. Use a drone or high-powered binoculars to inspect from the ground. If you must go up, wear a Type 5/6 disposable coverall and a fit-tested FFP3 respirator mask. These items prevent microscopic fibres from entering your lungs. Keep the noise down and the safety high by avoiding any power tools on these materials.
What are crawling boards and where can I get them for a DIY project?
Crawling boards are specialist timber or aluminium platforms designed to spread your weight across fragile roof sections. They prevent you from falling through the ceiling if a tile snaps. You can hire them from UK outlets like HSS Hire or Speedy Hire for approximately £40 per week. These boards are essential for any DIY project involving older materials. They provide a secure path and protect the integrity of your home while you work.
Can I use a standard DIY ladder for roof access, or do I need a specialist one?
Ditch the basic domestic ladder and use an EN131 Professional rated model for any roofing work. Standard ladders often fail to provide the 150kg load capacity required for a person carrying tools. You also need a dedicated roof ladder with a heavy-duty ridge hook to secure it over the peak. This specialist gear for safe roof repairs ensures your access point doesn’t slide sideways. It’s a small investment for a massive increase in stability.
How often should I inspect my fall arrest gear for damage?
Perform a visual check every single time you put your harness on. Look for frayed webbing, rusted D-rings, or chemical burns on the straps. According to British Standard BS EN 365, you must also have a formal, documented inspection by a competent person every 6 months. If your gear has been involved in a fall, it’s finished. Cut it up and throw it away immediately. Never compromise on the integrity of your life-saving equipment.
What should I do if I feel dizzy or anxious while working at height?
Stop moving immediately and fix your gaze on a stable object like a chimney stack or the ridge line. Don’t look down at the ground. Maintain three points of contact with the roof or ladder until the sensation passes. Once you feel calm, descend slowly and take a break. Vertigo is a clear signal that your body isn’t vibing with the height. Listen to that instinct and only head back up when you are 100% focused.