Why hand over £3,000 to a contractor when a £50 resin kit and a single Saturday can save your home? You see those hairline fractures and feel the immediate dread of structural rot. It’s a valid fear. Industry reports suggest that 65% of UK homeowners overpay for full roof replacements because they can’t spot a simple surface fix. Most people stare at fibreglass roof cracks and see a financial disaster. You’re likely tired of the confusing jargon and skeptical of the massive quotes landing on your mat.
We’re here to disrupt that narrative. Stop the leaks and skip the replacement with our high-octane guide to DIY restoration. We’ll give you a clear yes or no on whether your roof’s salvageable in under 5 minutes. You’ll get a punchy list of tools and the exact steps to restore your GRP surface for 2026. It’s time to cut through the noise, grab the rollers, and save your cash. Let’s Gooforit.
Key Takeaways
- Crack the code on GRP noise. Learn to distinguish between minor cosmetic fibreglass roof cracks and total structural laminate failure.
- Execute a pro-level 10-point inspection to hunt down “alligatoring” and spongy deck spots before they wreck your vibe.
- Ditch the contractor and go for it. Grab the SpeedPatch kits and restoration coatings to handle the repair with total confidence.
- Save thousands of pounds and future-proof your roof with a UV-stable shield that makes a full replacement unnecessary.
Decoding the Noise: What Your Fibreglass Roof Cracks Are Telling You
Your roof is making noise. It’s not just the wind. It’s a distress signal. Most UK homeowners mistake GRP (Glass Reinforced Plastic) for a set-and-forget solution. It isn’t. To effectively tackle fibreglass roof cracks, you must first understand what fibreglass is: a high-strength, rigid composite of glass fibres and resin that demands respect. When your roof starts talking back with sharp pops and groans, it’s telling you the system is under extreme mechanical stress.
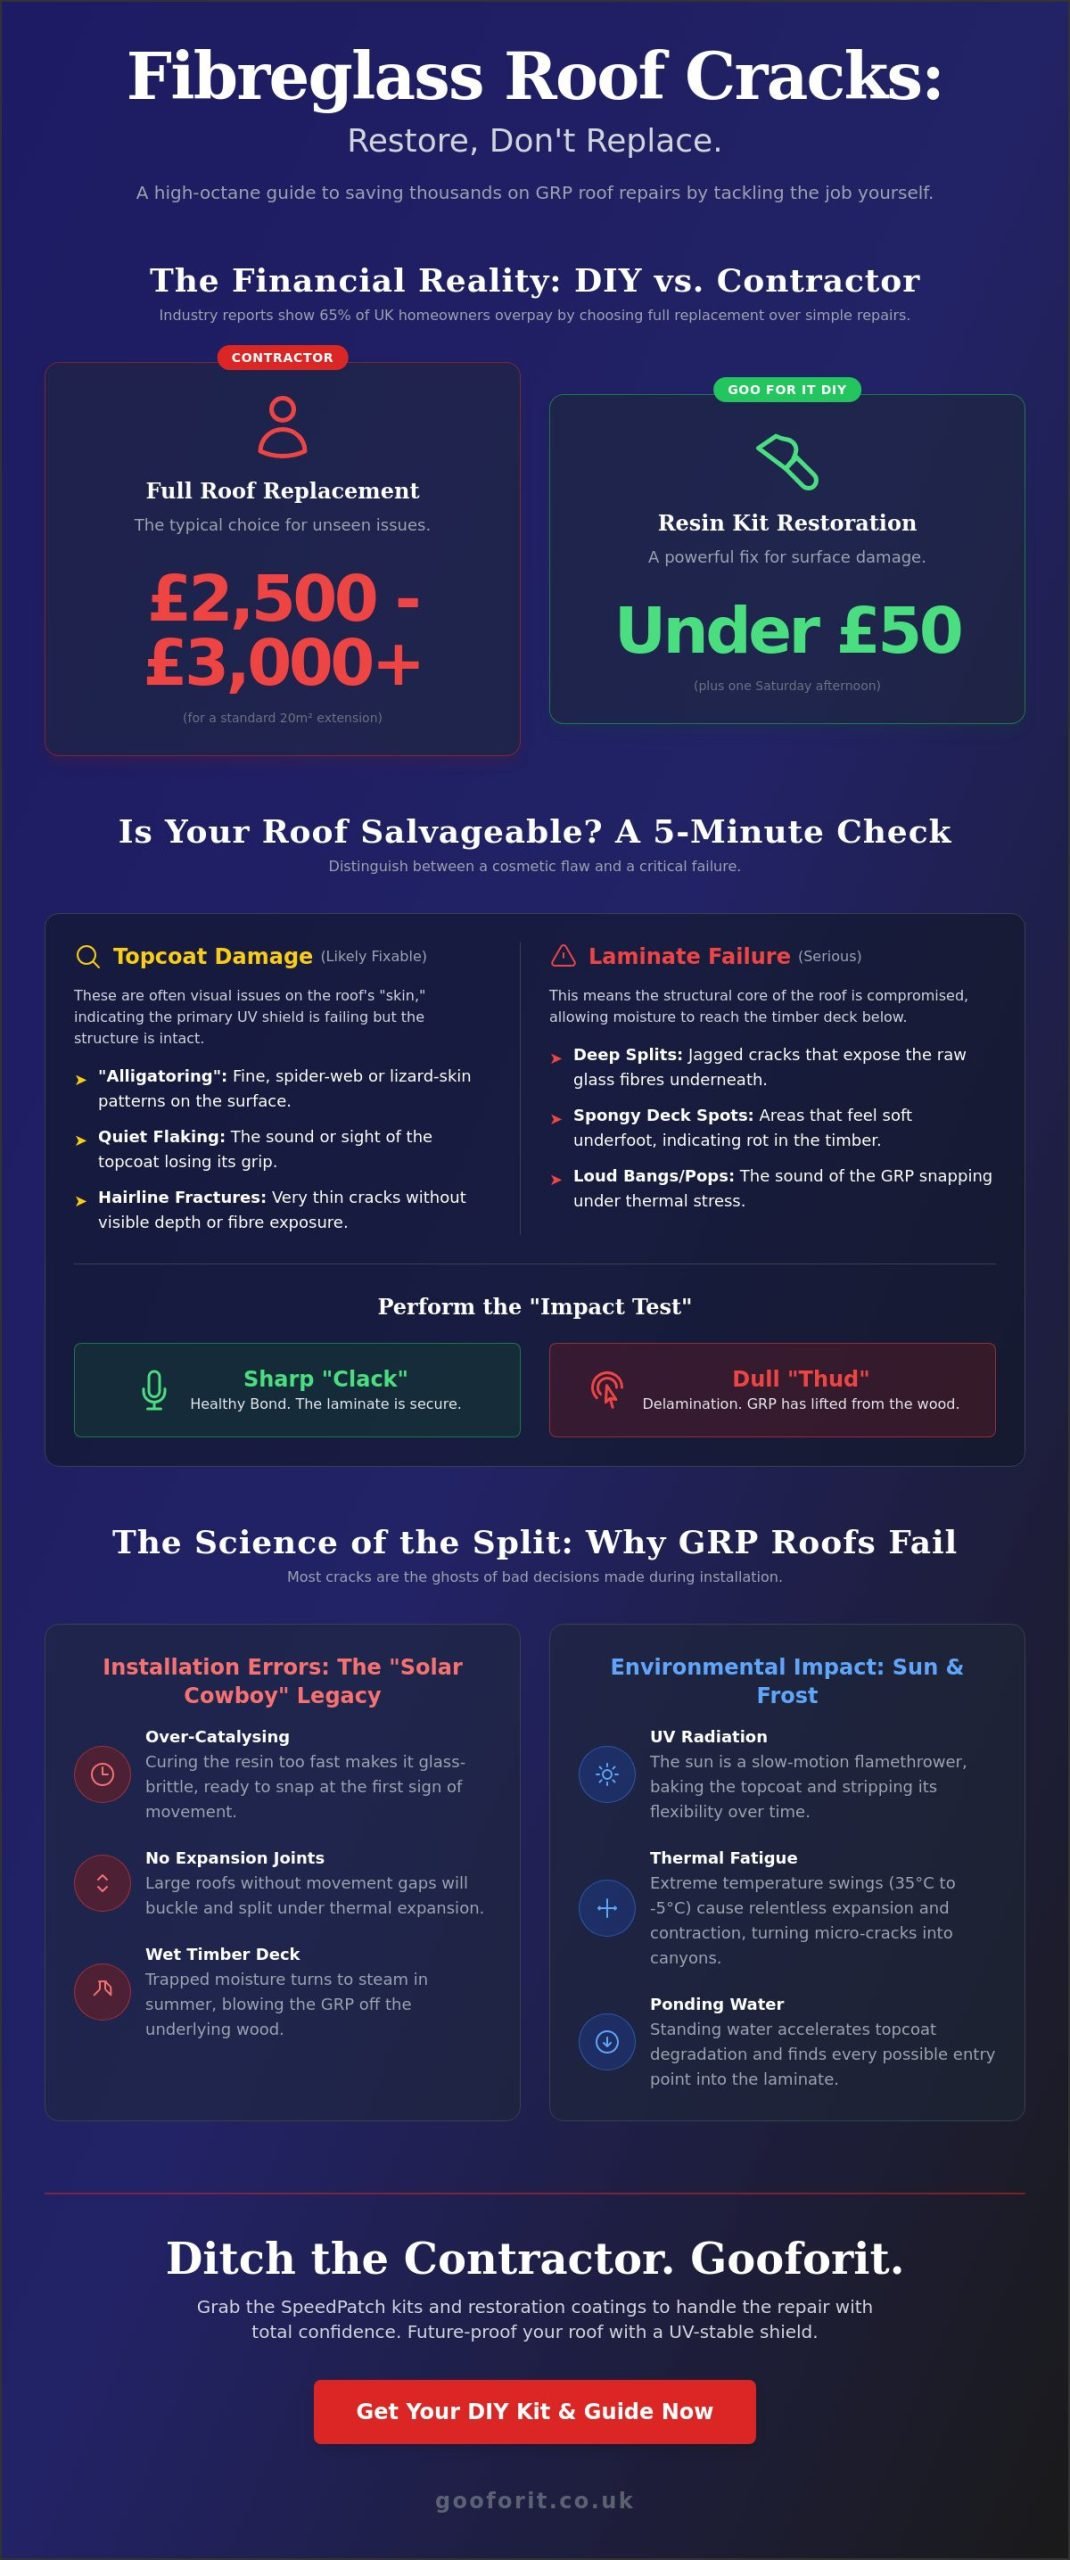
Stop the panic. Don’t call the demolition crew just yet. We thrive on the “Restore, Don’t Replace” philosophy. A full professional replacement for a standard 20m² UK extension can easily exceed £2,500 in 2026. Restoration costs are significantly lower. Ignoring a tiny hairline fracture is a high-stakes gamble. Once moisture hits the underlying OSB3 timber deck, the clock starts ticking. Saturated timber rot spreads 40% faster than surface degradation. Act now. Save your bank balance. Disrupt the decay before it disrupts your life.
The Sound of Stress: Expansion and Contraction
UK weather is a chaotic rollercoaster. We often see 30-degree temperature swings within a single 24-hour cycle. This volatility creates thermal shock. Your roof expands under the midday sun and contracts rapidly at night. Those audible “pops” you hear at 10 PM are the sounds of a rigid material fighting against its own fixings. If the installer didn’t leave enough room for movement, the GRP will eventually snap.
Thermal expansion is the physical increase in a material’s volume as temperature rises, forcing rigid GRP to fight against its own fixings.
- Audible Creaks: Signify the laminate is rubbing against the timber deck.
- Loud Bangs: Often indicate a failure in the expansion joints or perimeter trims.
- Quiet Flaking: The sound of a topcoat losing its grip on the world.
Topcoat vs. Laminate: Identifying the Depth
You need to know if you’re looking at a scratch or a mortal wound. Visual cues are your best friend here. “Alligatoring” or fine spider-web patterns usually point to a failing topcoat. This is often caused by the resin being applied too thick during the original build. It’s unsightly, but it’s usually just the “skin” of the roof. Deep, jagged splits that show the raw glass fibres underneath mean the structural laminate is compromised.
Perform the “Impact Test” to be certain. Use a heavy coin or a small hammer to tap around the fibreglass roof cracks. A sharp, crisp “clack” means the bond is still healthy. A dull, hollow “thud” signals delamination. This is where the GRP has physically lifted away from the wood. Your topcoat is your primary shield against UV radiation; once it fails, the sun will eat your structural laminate for breakfast. Fix the surface to save the core.
The Science of Split: Why GRP Roofs Crack and Fail
Most GRP roofs don’t just fail; they’re sabotaged from day one. While fibreglass is legendary for its 30-year lifespan, poor execution turns that dream into a leaking nightmare. When you spot fibreglass roof cracks, you’re usually looking at the ghost of a bad decision made during installation. It’s not just bad luck. It’s chemistry and physics working against you. Your roof is a high-performance shield, but even the best shields shatter if they’re built with brittle bones.
Installation Errors: The “Solar Cowboy” Legacy
The “Solar Cowboy” loves a shortcut. The most common crime is over-catalysing. To speed up the cure on a cold morning, rogue installers often dump in more than the recommended 2% to 4% hardener. This makes the resin cure too fast and too hot. The result is a roof that’s glass-brittle and ready to snap at the first sign of movement. It looks fine for a year, then it fails when the seasons shift.
- No Expansion: Large roof areas exceeding 50 square metres need expansion joints. Without them, the GRP has nowhere to go when the sun hits. It buckles. It splits. It screams.
- Wet Timber: Laying resin over damp OSB3 boards is a death sentence. Trapped moisture turns to steam in the summer, blowing the GRP off the deck and causing massive delamination.
- Thin Laminate: Using 450g matting when the spec calls for 600g saves pennies but sacrifices the structural integrity of the entire system.
Environmental Impact: UV and Thermal Fatigue
The UK sun is a slow-motion flamethrower. Over a decade, UV radiation bakes the topcoat, stripping away its flexibility. This leads to “alligatoring.” Your roof starts looking like parched lizard skin. It’s a sign the resin has lost its soul and its ability to move. When the temperature swings from a 35°C rooftop peak in July to a -5°C frost in January, the thermal fatigue is relentless. Every micro-crack becomes a canyon.
Ponding water adds another layer of chaos. A 10cm deep puddle exerts roughly 100kg of weight per square metre. This hydraulic pressure forces moisture into microscopic pores that would otherwise stay dry. If you want to stop the rot before it starts, you need to go for it and address these structural weak points before the next storm hits. By the time a 20-year-old roof starts “star-cracking,” the internal matting is usually already compromised. You aren’t just fixing a crack; you’re fighting a decade of environmental assault that finally broke the seal.
The Ultimate 10-Point Fibreglass Roof Inspection Checklist
Stop guessing. Start hunting. Your roof is a shield, but even the best GRP systems fail under the relentless UK weather. Grab your ladder. We are going up to find those fibreglass roof cracks before they find your ceiling.
- Step 1: The Perimeter Check. Walk the edges. Inspect the lead flashing and GRP trims. If the trims are pulling away from the brickwork or the sealant has perished, water is already winning.
- Step 2: The Spongy Walk. Tread carefully. If the surface feels like a trampoline or gives under your weight, you have a deck failure. Soft spots mean the underlying OSB board is saturated and rotting.
- Step 3: Alligatoring Scan. Look for the reptile skin pattern. This is “alligatoring,” a classic sign of UV death. The topcoat has become brittle and is literally breaking apart under the sun.
- Step 4: Joint Integrity. Focus on where the GRP sheets meet. These seams are the frontline. Any lifting or visible gaps here will lead to immediate internal damp.
- Step 5: The Pinhole Test. Wipe a damp cloth over a dry section of the roof. As it dries, tiny dark spots will remain. These are pinholes. They look small, but they act like straws for rainwater.
Critical Failure Points to Watch For
Check the upstands and chimney junctions first. These 90-degree angles endure the most thermal stress. Look for “crazing,” which looks like fine spider webs in the resin. It is the precursor to deep fibreglass roof cracks. Use the Coin Tap method: tap the surface with a 50p piece. A sharp “clack” is good. A hollow “thud” means delamination. The glass mat has separated from the wood. It is a ticking time bomb.
Documentation: Mapping Your Roof’s Damage
Don’t trust your memory. Grab your phone and a 50p coin. Place the coin next to every crack you find before snapping a photo. This gives you an instant scale for the damage. Create a “repair map” on a simple sketch of your roof layout. This helps you calculate exactly how many litres of restoration coating you need to buy. Marking every defect with a piece of white tailor’s chalk is a pro DIY move because it ensures you won’t miss a single hairline fracture once the repair resin starts flowing. Go for it. Be meticulous now so you don’t have to do this again in 2027.
DIY Restoration Strategy: Fixing Cracks Without the Contractor
Stop waiting for a quote that will make your eyes water. You are more than capable of handling this. Restoring fibreglass roof cracks is about grit and the right gear. Forget the contractor’s three-week lead time. Grab a SpeedPatch kit or a professional GRP restoration coating and take control of your property. This is your roof. Own the process. You don’t need a degree in chemistry; you just need the willingness to get your hands dirty and follow the rhythm of the repair.
Preparation: The Foundation of Every Great Repair
Success starts with the grind. You cannot skip the dirty work. Remove every scrap of moss, lichen, and loose topcoat. If the surface is slick or contaminated, the bond will fail. It is that simple. Use a stiff brush and high-pressure air to clear the debris. Sand the area until you see fresh laminate. This creates the mechanical key your coating craves to stay locked down for the next decade.
Acetone is your secret weapon here. It does more than clean; it reactivates the old GRP surface. This chemical softening allows the new resin to fuse with the old, creating a monolithic seal rather than a weak patch. For a deeper dive into common pitfalls, check out our Fibreglass Roof (GRP) Problems & DIY Repair Solutions: The Ultimate FAQ. Don’t move a muscle until that surface is bone dry and chemically prepped for action.
Applying the Restoration Coating
Mixing is where the vibe gets real. Get the catalyst ratio perfect. Too much and it cracks; too little and it stays tacky. Aim for a smooth, consistent flow that feels like heavy cream. If you are dealing with major splits, use the Scrim and Seal technique. Lay down your reinforcement tape directly over the fibreglass roof cracks, saturate it with resin, and roll out every single air bubble. This creates a reinforced bridge that moves with your building.
- Weather Window: You need a clear 24-hour dry slot. The UK climate is ruthless, so check the radar twice before you crack the seal on your resin.
- Tape Tech: Use 75mm emulsion-bound chopped strand mat for maximum impact on structural splits and joints.
- Application: Work in manageable sections. Don’t rush the roll-out, but don’t let the resin kick in the bucket.
The energy you put into this repair today dictates the next 20 years of your roof’s life. Stop the drip and start the disruption. If you want to see how we make noise in the restoration space, go for it and see our latest projects.
Future-Proofing: Long-Term Protection with Restoration Coatings
Slapping a patch on fibreglass roof cracks is like putting a plaster on a broken leg. It might hide the mess, but the structure is still failing. You don’t just want a fix; you want a full-scale UV-stable shield. A high-impact GRP restoration coating doesn’t just seal leaks. It creates a seamless, monolithic membrane that reflects heat and stops thermal shock in its tracks. This is how you disrupt the cycle of constant repair and keep your home dry.
The ROI of Restoration
Think about the numbers. A full professional re-roof in the UK can easily set you back £3,000 for a standard single garage. In contrast, a DIY restoration kit usually costs under £400 for the same area. That is a massive saving that stays in your pocket. These coatings add a flexible layer that moves with your building’s natural shifts, preventing future splits before they start. If you are dealing with more complex materials, check out our Asbestos Roof Repair: The Bold Homeowner’s Guide for specialized advice. Restoration isn’t just a budget move; it’s a smart play for your property’s vibe and longevity.
To keep your roof making noise for 15 years or more, you need a simple maintenance rhythm. Clear the gutters every six months. Inspect the surface after every major storm. If you see dirt build-up, wash it down with a gentle detergent. It’s about staying ahead of the damage before it starts to drain your bank account. A little attention now prevents a total collapse later.
Your Next Move: Start the Restoration
The time for talk is over. The weather won’t wait for you to feel ready. You need to reclaim your roof today. Here is your final checklist of gear to grab right now to handle those fibreglass roof cracks with confidence:
- GRP Restoration Coating (UV-stable and high-build)
- Reinforcement matting for high-stress joints
- Acetone for deep surface cleaning
- Heavy-duty rollers and extension poles
- Safety gear including gloves, goggles, and a respirator
Don’t wait for the drip to become a flood. Impact your home’s future by taking control of your roof before the next season hits. You have the knowledge. You have the drive. Now, Grab your GRP Restoration Kit and get to work! It’s time to stop the leaks and start the restoration. Go for it.
Own Your Roof. Stop the Split.
Stop waiting for the next storm to tell you what you already know. You have the 10-point inspection data. You have the restoration strategy. Those fibreglass roof cracks are not just surface noise; they are a direct signal to act before a full replacement costs you thousands. Restoration is about disrupting the decay and taking total control of your environment.
We are Gooforit. As Gloucestershire-based DIY experts, we live for high-impact results that break the standard corporate mold. Our specialist GRP restoration formulas deliver professional-grade, long-term waterproofing that stands up to the UK’s most aggressive weather. Forget the contractor’s schedule. You have the tools to future-proof your space with a vibe that lasts. This is about more than just a repair; it’s about a fearless commitment to your home’s performance.
The science is clear and the checklist is complete. It’s time to make some noise and secure your structure for 2026 and beyond. Stop the leaks and restore your roof, Shop GRP Restoration Coatings now!
Go for it. Your roof is ready for the ultimate upgrade.
Frequently Asked Questions
Is it normal for a fibreglass roof to have small cracks?
Cracks are never normal and usually signal that your topcoat was applied too thick, exceeding the recommended 0.5mm limit. These hairline fractures, often called crazing, mean the surface has become brittle and lost its ability to expand. If you spot these 1mm openings, act fast. Ignoring them allows water to seep into the laminate, which eventually destroys the structural integrity of your roof deck.
Can I just paint over cracks in my GRP roof?
No, applying a standard masonry or bitumastic paint is a temporary band-aid that fails within 6 months. Painting hides the fibreglass roof cracks but doesn’t seal them against UK weather cycles. You must use a dedicated GRP restoration resin to bridge the gaps. 90% of homeowners who only use paint end up spending 3 times more on structural repairs later that year.
How long does a fibreglass roof repair last?
A high-quality DIY repair using 600gsm glass mat and premium resin lasts between 15 and 20 years. This lifespan matches the original installation if you prep the surface correctly. Cheap patch kits might only give you a 24-month fix before the edges lift. Invest in professional-grade materials now to ensure your roof remains watertight until the 2040s. Go for it and do it right.
What is the best temperature to repair a fibreglass roof?
Target a dry day with temperatures between 15°C and 20°C for the perfect cure. Avoid working below 5°C because the chemical reaction will stall, leaving you with a sticky mess. If the mercury hits 30°C, your resin will “kick” in less than 10 minutes, giving you zero time to work. Check the 24-hour forecast to ensure no rain disrupts the bonding process.
Do I need to sand the roof before fixing the cracks?
Yes, sanding is the most critical step to ensure your new resin doesn’t peel off like a sticker. Use 40-grit sandpaper to strip the waxy topcoat and create a rough “key” for the new laminate. Without this mechanical bond, 100% of repairs will eventually delaminate. Clean the dust with pure acetone afterward to create a clinical surface ready for maximum impact and adhesion.
Will a leaking fibreglass roof cause the wood underneath to rot?
Yes, moisture ingress causes OSB3 timber decking to develop wet rot when moisture levels exceed 20%. Once the wood softens, it loses the ability to hold the GRP skin, leading to a total system failure. A £60 repair kit today prevents a full deck replacement that could cost over £2,800. Catch the leak early to keep your home’s skeleton bone dry and rock solid.
How do I know if my GRP roof is delaminating?
Listen for a distinct crunching or “hollow” sound when you walk across the surface. Delamination occurs when the fibreglass pulls away from the timber, often creating visible bubbles or “pillowing” across 10% or more of the roof. If the layers have separated, you’ll feel the roof flex under your boots. This vibe isn’t just annoying; it means your roof is no longer a single, unified shield.
Can I use a GRP repair kit on an asbestos roof?
No, you should never use a standard GRP kit to fix fibreglass roof cracks on asbestos cement sheets. UK health regulations from the HSE are strict about disturbing asbestos because it releases dangerous fibres. Standard resins also struggle to bond with the porous, dusty surface of old corrugated sheets. If your roof was installed before 1999, call a licensed specialist to handle the situation safely and legally.