Yes, you absolutely can recoat a fibreglass roof — and in many cases, it’s the smartest way to extend its life without the cost and disruption of a full replacement.
Over time, even the best GRP (glass reinforced plastic) roofs can start to show their age. UV exposure, weathering, and general wear can leave the topcoat looking faded, chalky, or cracked. The good news? A recoat can restore your fibreglass roof to as-good-as-new condition, giving you years of extra protection at a fraction of the cost of starting from scratch.
In this guide, we’ll walk you through everything you need to know about recoating a fibreglass roof with the tough and flexible GRP Restoration Coat — when it’s the right call, how to do it properly, and what products you’ll need.
When Does a Fibreglass Roof Need Recoating?
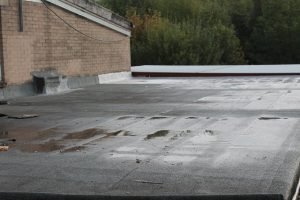
The fibreglass laminate underneath your topcoat is incredibly durable. It’s the topcoat, the coloured, UV-resistant layer on the surface, that takes the brunt of the weather. Here are the telltale signs that a recoat is due:
- Chalking or fading. Run your hand across the surface. If it leaves a powdery residue on your fingers, the topcoat has broken down.
- Hairline cracks or crazing. Fine surface cracks in the topcoat don’t necessarily mean the laminate is damaged, but they will let moisture in if left untreated.
- Discolouration or patchiness. Uneven colour or yellowing suggests the UV protection has worn away.
- Loss of gloss. A fibreglass roof that once had a smooth, glossy finish but now looks flat and dull is ready for attention.
If the underlying laminate is still sound, so it has no soft spots, no delamination and no structural issues, then a recoat with GRP Restoration Coat is almost certainly all you need.
Can You Recoat Over the Existing Topcoat?
Yes, you can apply a new topcoat directly over the existing one, provided you prepare the surface properly. This is the key step that separates a recoat that lasts from one that peels off within months. You need a coating that is flexible and will take the weathering and movement that an old GRP roof inevitably has.
Proper preparation means:
- Clean the roof thoroughly. Remove all dirt, moss, algae, and debris. A pressure washer works well but make sure the surface is completely dry before you move on.
- Sand the surface. If there any rough spots or very shiny areas use 40–80 grit sandpaper or a sander to abrade the old topcoat. This creates a mechanical key for the new coating to bond to and stops any raised roughness protrude through a new coating. You’re not trying to remove the old topcoat, just scuff it up so it’s no longer smooth and glossy and remove raised rough particles.
- Remove all dust. Vacuum or wipe down the surface with acetone to remove every trace of sanding dust and any surface contaminants. If it is just dirt that needs removing a gentle detergent in water is enough but be sure to rinse off any residue.
- Check for damage. Before recoating, inspect the surface for any cracks, blisters, or soft spots that need repairing first. Attempting to recoat over damaged laminate is a waste of time and money – fix the problem areas first, then recoat the whole roof.
What About Repairing Damage Before Recoating?
If your roof has more than just surface wear — perhaps there are cracks that go deeper than the topcoat, small areas of delamination, or spots where impact damage has occurred — you’ll want to carry out repairs before applying your new topcoat.
GRP repairs with the GRP Restoration Coat are straightforward with the right products. The fastest way to cover a hole is use the a SpeedPAtch. Alternatively, embed fibreglass chop strand matting in the GRP Restoration Coat over any damaged o suspect areas. Once the repair has cured sufficiently to stand an overcoat and been sanded flush with the surrounding surface, you can topcoat over it seamlessly.
If there are small holes or cracks you can use the PU Sealant like a filler and coat over with the GRP Restoration Coat as soon as the sealant is solid enough.
At GooForIt, we supply everything you need for GRP repairs and recoating, so you can tackle the whole job in one go.
How to Recoat a Fibreglass Roof: Step by Step
Once your roof is clean, sanded, and any repairs have been made, the recoating process itself is relatively simple:
- Choose the right conditions. Work on a dry day with temperatures between 15°C (5) and 25°C. Be aware the roof temperature can be considerably higher than air temperature. Avoid direct strong sunlight, (GRP Restoration Coat cures by moisture in the air but the roof surface must be dry on application) and any risk of rain for at least 12 hours after application.
- Stir the GRP Restoration Coat. Gently stir the GRP Restoration Coat to ensure any settlement is fully mixed – don’t use a mechanical mixer because you could add air bubbles.
- Apply evenly. Use a roller or brush to apply the topcoat in even, consistent coats. Work in manageable sections.
- Allow to cure. Let the GRP Restoration Coat cure fully before walking on it or exposing it to foot traffic. Curing times vary depending on temperature and the product used, but typically allow at least 24 hours.
- Inspect your work. Once cured, check for any missed spots, runs, or uneven areas. A light sand and a touch-up coat can sort out any minor imperfections.
How Long Will a Recoated Fibreglass Roof Last?
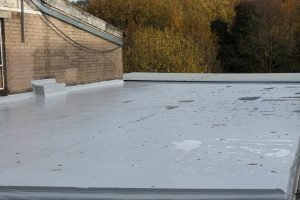
A properly prepared and recoated fibreglass roof can easily last another 10 to 15 years before needing attention again. The longevity depends on the quality of preparation, the products used, and the level of UV and weather exposure your roof faces.
This is one of the great advantages of GRP Restoration Coat — it’s a system that can maintain and refresh an old Fibreglass Roof over time, rather than ripping off and replacing when it starts to age.
Why Choose Goo For It for Your Fibreglass Recoat?
We know GRP inside and out. Our fibreglass over-coating system and repair products are designed to make recoating and maintaining your fibreglass roof as simple and reliable as possible – whether you’re a seasoned professional or a confident DIYer tackling it for the first time.
Here’s what sets us apart:
- Complete coating systems. Everything you need for a recoat in one place – topcoat, catalyst, and preparation materials.
- GRP repair products. If your roof needs patching up before recoating, our repair kits have you covered.
- Expert guidance. Not sure what you need or how to get the best result? We’re here to help.
Don’t replace your fibreglass roof when a recoat will do the job. Save yourself time, money, and hassle – and give your roof the protection it deserves.
Ready to recoat your fibreglass roof? Browse our fibreglass coating system and GRP repair products to get started, or get in touch if you need advice on your project.