That standing water, or "ponding," is a clear signal that your roof isn’t draining correctly. This guide gives you the practical, DIY methods to map, measure, and fix roof low spots before they cause serious damage to your home.
Table of Contents
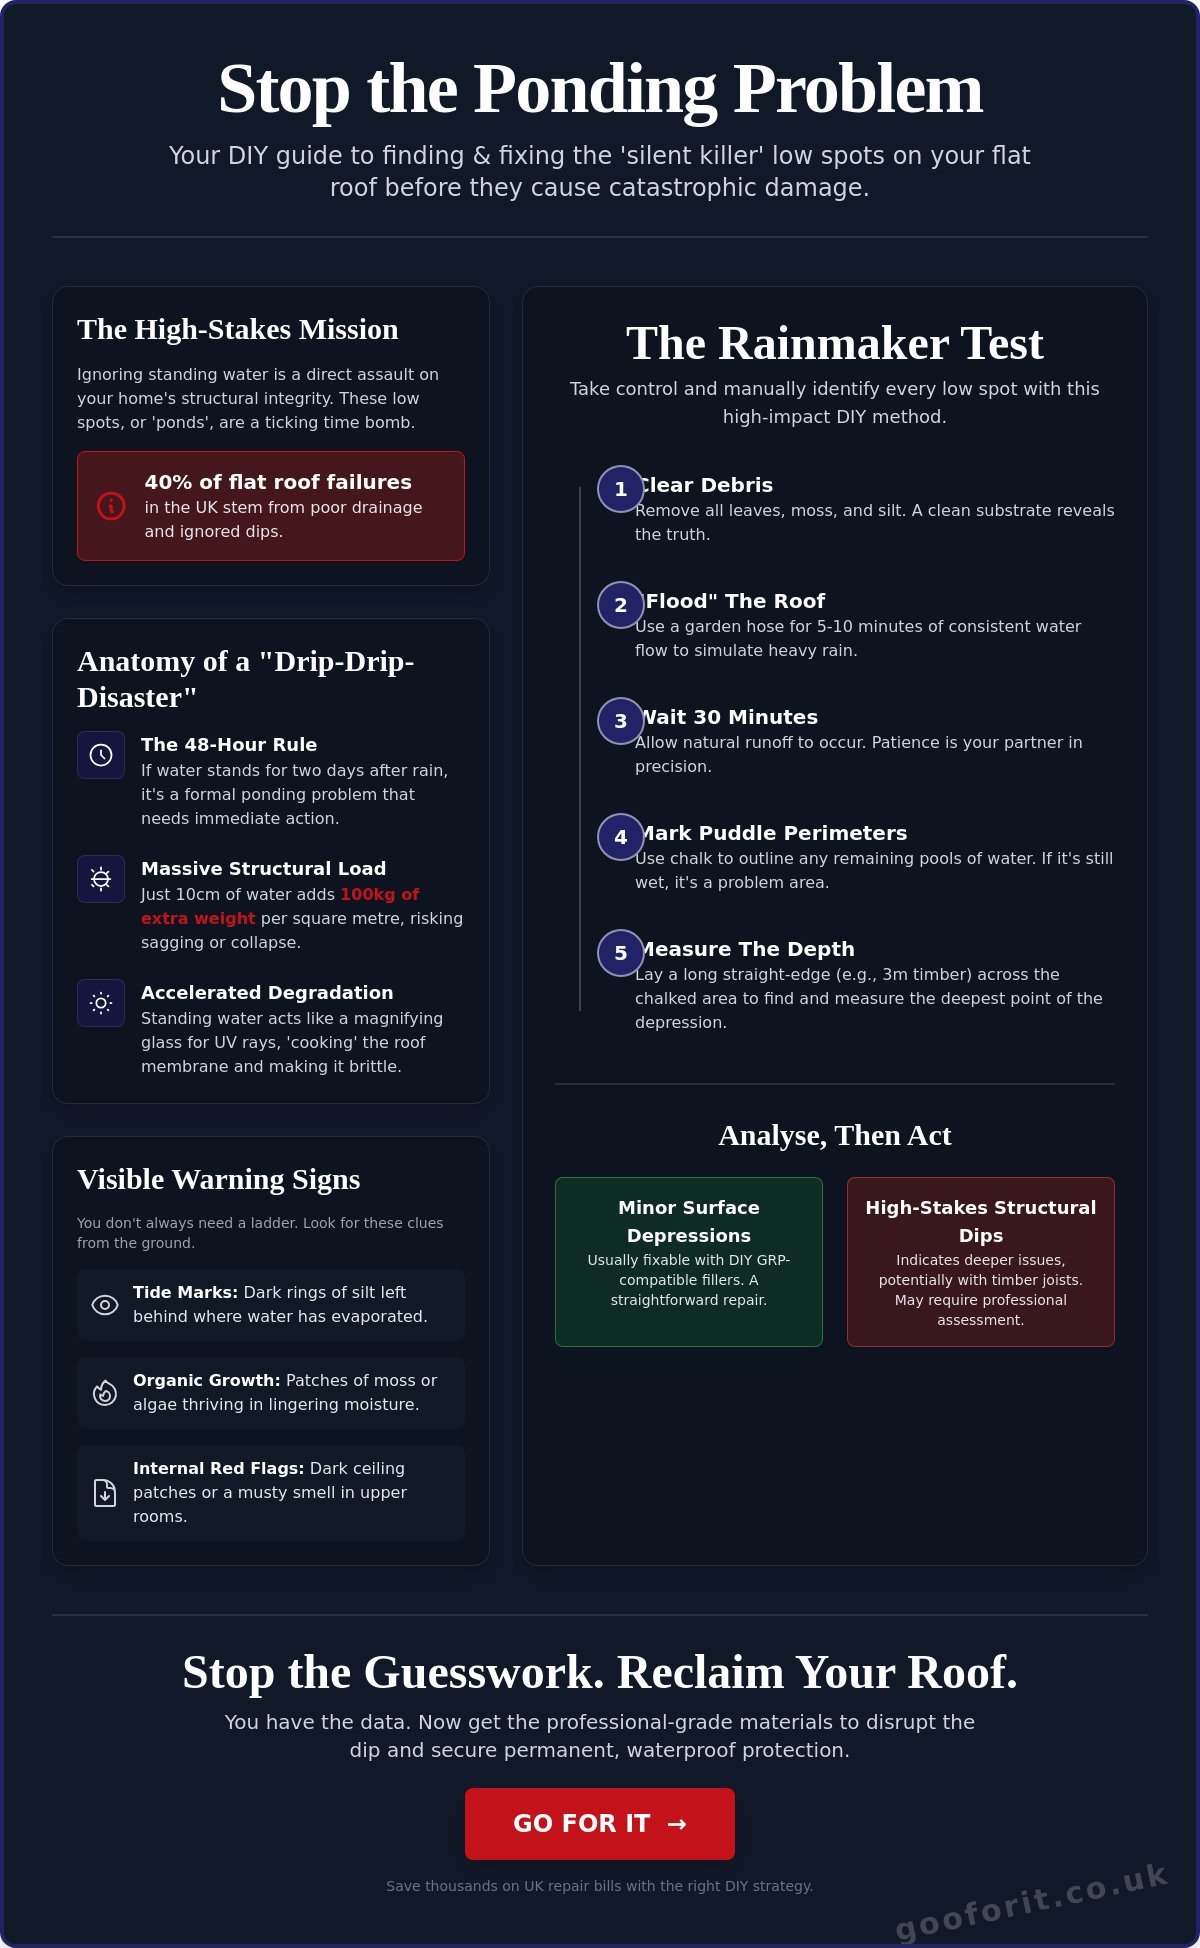
Why Identifying Roof Low Spots is Important
Low spots are depressions on your roof’s surface where water collects instead of draining away. They are the silent killers of flat roofs, creating problems that escalate quickly if ignored. Understanding the threat is the first step toward taking control.
-
The 48-Hour Rule: If water is still standing on your roof two days after it has rained, you have a ponding problem. This is the industry benchmark for unacceptable water retention.
-
Weight Stress: Water is heavy. A puddle just one inch deep adds over 2.3kg of weight per square foot. This constant load can stress your roof deck and the underlying joists, leading to structural sagging.
-
Accelerated Decay: Ponding water magnifies the sun’s UV rays, breaking down your roof’s protective membrane far faster than a dry surface would.
-
The Drip-Drip-Disaster: Eventually, this cycle of stress and decay leads to cracks, leaks, and the dreaded "drip-drip-disaster" of internal damp, mould, and costly repairs.
The Anatomy of a "Ponding" Problem
Ponding water creates a destructive feedback loop. As water sits, it collects dirt and silt, which provides a fertile ground for moss and algae. These growths hold even more moisture against the roof membrane. The combination of constant moisture and focused UV radiation acts like a magnifying glass, degrading the material and making the depression worse. It’s crucial to differentiate between a simple surface issue and a deeper structural problem. A surface-level dip might be due to compressed insulation, whereas a structural sag indicates a potential issue with the roof’s joists or decking. For GRP (fibreglass) roofs, this constant exposure can lead to blistering and cracking. You can learn more about common fibreglass roof problems and their solutions in our detailed FAQ.
According to Ponding water, this is a well-documented area of ongoing research and practical application.
Visible Warning Signs You Can Spot from the Ground
You don’t always need to get on the roof to suspect a low spot. Keep an eye out for these tell-tale signs from ground level:
-
"Tide Marks": Look for rings of dirt or silt left behind after a puddle evaporates. This is a clear map of where water has been sitting.
-
Moss and Algae Patches: Green or black patches of organic growth are a major red flag. These organisms only thrive in areas with persistent dampness.
-
Sagging Ceilings: The ultimate warning sign. If you see dark water stains, peeling paint, or a visible sag on the ceiling inside your property, the problem has already escalated to a serious leak.
The Rainmaker Test: How to Identify Roof Low Spots Manually
You don’t need to wait for a storm to find the problem areas. With a hosepipe and a methodical approach, you can create your own controlled "rain event" to map every dip and depression on a dry day. This is the most effective way to identify roof low spots without professional equipment.
-
Clear the Surface: Before you begin, thoroughly sweep the roof. Remove all leaves, twigs, and debris. Pay close attention to clearing out gutters and drain outlets so you can accurately assess the roof’s drainage.
-
Flood the Roof: Use a hosepipe to gently spray water across the roof surface for 5 to 10 minutes. Aim for consistent coverage, simulating a steady rainfall rather than a high-pressure jet wash.
-
Wait and Watch: Turn off the water and wait for 30-45 minutes. This gives the properly sloped areas time to drain completely, leaving behind distinct puddles in the low spots.
-
Mark the Puddles: Using a piece of chalk, carefully draw a line around the perimeter of every remaining puddle. You now have a precise map of your problem areas.
-
Find the Deepest Point: Place a long, straight-edged piece of timber or a spirit level across the chalked-off area. The largest gap between the straight edge and the roof surface marks the deepest point of the low spot. Measure this gap to understand the severity of the dip.
Chalk Mapping and Gridding Your Roof
To get a better understanding of the roof’s topography, use your chalk to draw a 1-metre grid across the entire suspect area. This visual grid helps you see how the slope behaves and where water is failing to flow toward the drains. Low spot mapping is simply the process of marking these topographical dips on a dry roof substrate to plan an effective repair. Note the direction water should be flowing and compare it to where it’s actually pooling within your grid.
Research published by National Roofing Contractors Association shows that this is a well-documented area of ongoing research and practical application.
Identifying Subtle Dips Without a Laser
Not all low spots are obvious puddles. Some are subtle depressions that still hold enough moisture to cause damage over time. Here are two simple DIY methods to find them:
-
The Marble Test: On a completely dry and clean roof, place a few marbles on the surface. They will naturally roll and settle into the lowest points, revealing subtle dips you might otherwise miss.
-
The String Line Method: To measure the depth of a known depression, run a taut string line from one high side to the other. Measure the distance from the string down to the deepest point of the dip. This gives you a precise measurement in millimetres, which is essential for choosing the right filler material.
Analysing the Damage: Ponding vs. Structural Dips
Once you’ve mapped the low spots, you need to determine their cause. Not all depressions are created equal—some are cosmetic surface issues, while others point to a critical structural failure.
-
Surface Depressions: These are often caused by compressed insulation under the roof membrane, minor settlement, or the natural aging of materials like felt. The roof deck itself remains solid.
-
Structural Sags: This is a more serious issue caused by water-damaged decking (chipboard or plywood), or incorrectly sized or failing roof joists.
Use the "Bounce Test" to investigate further. Carefully walk across the suspect area. If the roof deck feels solid and firm underfoot, the issue is likely a surface depression. If it feels spongy, soft, or bouncy, you are almost certainly dealing with a structural sag caused by rotten decking. This requires more urgent attention.
Research published by dangers of ponding water shows that this is a well-documented area of ongoing research and practical application.
When to Restore and When to Repair
Your analysis will dictate your next move. If the bounce test shows the roof deck is solid, a DIY restoration is an excellent and cost-effective solution. You can fill the low spots and apply a protective coating to create a seamless, properly draining surface. However, if you discover a spongy, structural dip, filling it is only a temporary fix that masks a serious underlying problem. The rotten deck will continue to degrade, and the issue will return. In this case, the decking must be replaced before any waterproofing is applied. Our guide on GRP roof restoration vs. replacement can help you weigh your options.
The Role of Gutter Alignment
Sometimes, the "low spot" isn’t on the roof at all. A blocked or poorly aligned gutter can cause water to back up onto the roof, creating a ponding issue near the edge. Before planning a complex roof repair, check your gutters. Ensure they are clear of debris and that the outlets are the lowest point. Also, inspect the fascia boards they are attached to. If the fascias have dropped or rotted, it can alter the gutter’s angle, preventing water from draining away correctly.
The DIY Levelling Playbook: Fixing the Dips
With your roof mapped and the cause identified, it’s time to take action. The goal is to disrupt the dip and force water to move toward the drains. For a solid roof deck with surface-level depressions, you have several effective DIY options.
-
Option 1: Filling the Low Spot: Use our specialized, Surface Level Pro compound designed for roofing to fill the depression and create a level surface.
-
Option 2: Applying a High-Build Coating: For very minor irregularities, a thick restoration coating can be applied in multiple layers to build up the surface and smooth out the dips.
-
Option 3: Installing a "Cricket": A cricket is a small, sloped structure that diverts water. You can build a subtle wedge-shaped diversion using filler to guide water around an obstacle or toward a drain.
Filling the Void: Material Selection
Do not use standard cement, wood filler, or all-purpose DIY fillers. These materials are not designed for the extreme temperature fluctuations and movement a roof endures. They will quickly crack, delaminate, and fail, making the problem worse. You must use a self-levelling compound or filler that is specifically formulated for roofing applications. Material compatibility is essential; ensure the filler you choose is designed to bond with your existing roof membrane, whether it’s GRP, felt, or EPDM.
Diverting the Flow
When you apply filler, the technique is as important as the material. Your goal is to create a smooth, gradual transition. Always "feather" the edges of your repair, tapering the filler so it blends seamlessly with the surrounding roof. An abrupt edge will act like a small dam, creating a new ponding problem right next to your fix. And remember, safety first: always wear non-slip shoes on a roof and use a stable, properly secured ladder for access.
Goo For It: Permanent Protection with SpeedPatch and Coatings
Your mapping is done and your plan is set. Now it’s time for decisive action. By combining an immediate patch with a full restoration coating, you can permanently solve the ponding issue and protect your entire roof for years to come.
Sealing the Spot with SpeedPatch
During your inspection, you may have found cracks or small leaks at the bottom of a low spot. For an instant, waterproof seal, use the SpeedPatch. This is the ultimate emergency fix for a leaking area. It can be applied in seconds to stop an active leak and secure the surface before you apply a filler or coating. It’s an essential tool for providing an immediate seal on everything from GRP to corrugated asbestos roofs. For specific guidance on older roofs, see our guide to safely repairing asbestos roofs.
Achieving a Full Restoration
After filling and levelling the low spots, the final step is to apply a full restoration coating. Our GRP Roof Restoration Coating creates a single, seamless, and completely waterproof membrane across the entire roof. This not only reinforces your repairs but also ensures that the whole surface sheds water properly, preventing new low spots from forming. This bold approach to DIY maintenance protects your investment and saves you thousands of pounds compared to a professional "rip-and-replace" job. Stop the ponding – Goo For It and restore your roof today.