Drip. Drip. Chaos. It is 3:00 AM on a Tuesday morning. You are staring at a fresh yellow bulge in your bedroom ceiling while a plastic bucket plays a mocking, rhythmic tune. That leak is the ultimate vibe killer. It is a direct hit to your home value. You already know that learning how to stop leak in roof from inside is the only way to prevent a minor patch from becoming a £4,800 structural nightmare. The fear of escalating costs is real, but you do not have to wait for a professional to show up.
We are here to flip the script and give you total control. This guide delivers the high-octane DIY steps you need to contain the water immediately and the bold moves required to fix the breach permanently from the outside once the sun breaks through. We are breaking down the emergency diversion tactics and tile-saving strategies you need to protect your investment and your sanity. It is time to go for it and get your home bone-dry. Let’s turn that stress into action.
Key Takeaways
- Learn why internal patches are temporary band-aids and how to stop leak in roof from inside using the “Pilot Hole” trick to rescue your ceiling.
- Master the “Torch and Trail” method to track moisture across rafters and find the true source of the vibe-killing drip.
- Transition from quick fixes to a permanent cure with high-impact external coatings that disrupt the leak cycle forever.
- Ditch the wait for pricey contractors and embrace a high-octane DIY approach to home protection.
- Get the secret to professional-grade surface prep for a bond that stands up to the toughest British downpours.
Stop Leak in Roof from Inside: Can You Actually Fix It?
Water is dripping. Your heart is racing. You want to stop leak in roof from inside before your living room becomes a swimming pool. Let’s get real. You can’t actually fix a roof from the attic. Not permanently. Internal patches are band-aids. They are tactical manoeuvres, not victories. Gravity is a relentless opponent. Water pressure will eventually shred any internal sealant you slap on a damp rafter. It is physics, pure and simple.
Think of this as damage control. You are fighting for time. Every drop you catch now saves your flooring, your tech, and your peace of mind. But don’t be fooled. Trapped moisture is a silent killer. It invites timber rot and black mould colonies that thrive in the dark, damp corners of UK lofts. Your mission isn’t to seal the roof forever from your step-ladder. Your mission is to contain the chaos so you can Go For It with a real external repair when the clouds break.
The consequences of a leak often extend beyond the ceiling, with flooring being a primary casualty. If you find yourself needing to replace water-damaged floors, exploring modern, resilient options is a crucial part of the recovery process. While based in Singapore, Home Expo Asia offers excellent guides and galleries that can provide inspiration for styles like herringbone vinyl, which stand up well to life’s mishaps.
Containment vs. Cure: Setting Expectations
Plugging a hole from the inside is risky business. Water doesn’t just stop because you blocked its exit. It pivots. It follows the path of least resistance. Thanks to capillary action, that diverted water often travels along a joist to a new, hidden location. You might stop a visible drip only to create a massive, invisible rot pocket elsewhere. In the UK, our roofing systems rely on specific layering. If you try to stop leak in roof from inside by cramming sealant into a gap, you’re fighting the natural flow. Gravity always wins. Shift your mindset right now. You aren’t fixing anything yet. You’re managing a crisis like a pro.
When an Internal Stop-Gap is Essential
Sometimes, you have no choice. It’s 2 AM on a Tuesday. A storm is battering the tiles. You have a £1,200 sofa in the splash zone and a ceiling that looks like a sagging water balloon. This is when the internal stop-gap becomes your best friend. You need to act fast to protect what matters. Immediate action is about three things:
- Asset Protection: Divert water away from electronics, heirlooms, and expensive furniture.
- Weight Management: Stop water from pooling on top of plasterboard. A single square metre of saturated plasterboard can fail under the weight of trapped water, leading to a total ceiling collapse.
- Strategic Delay: You are buying a 24 to 48 hour window until the weather clears for a high-impact external application.
Stay sharp. Stay focused. Contain the mess now so you can dominate the repair later. This isn’t about being perfect; it’s about being fast and effective.
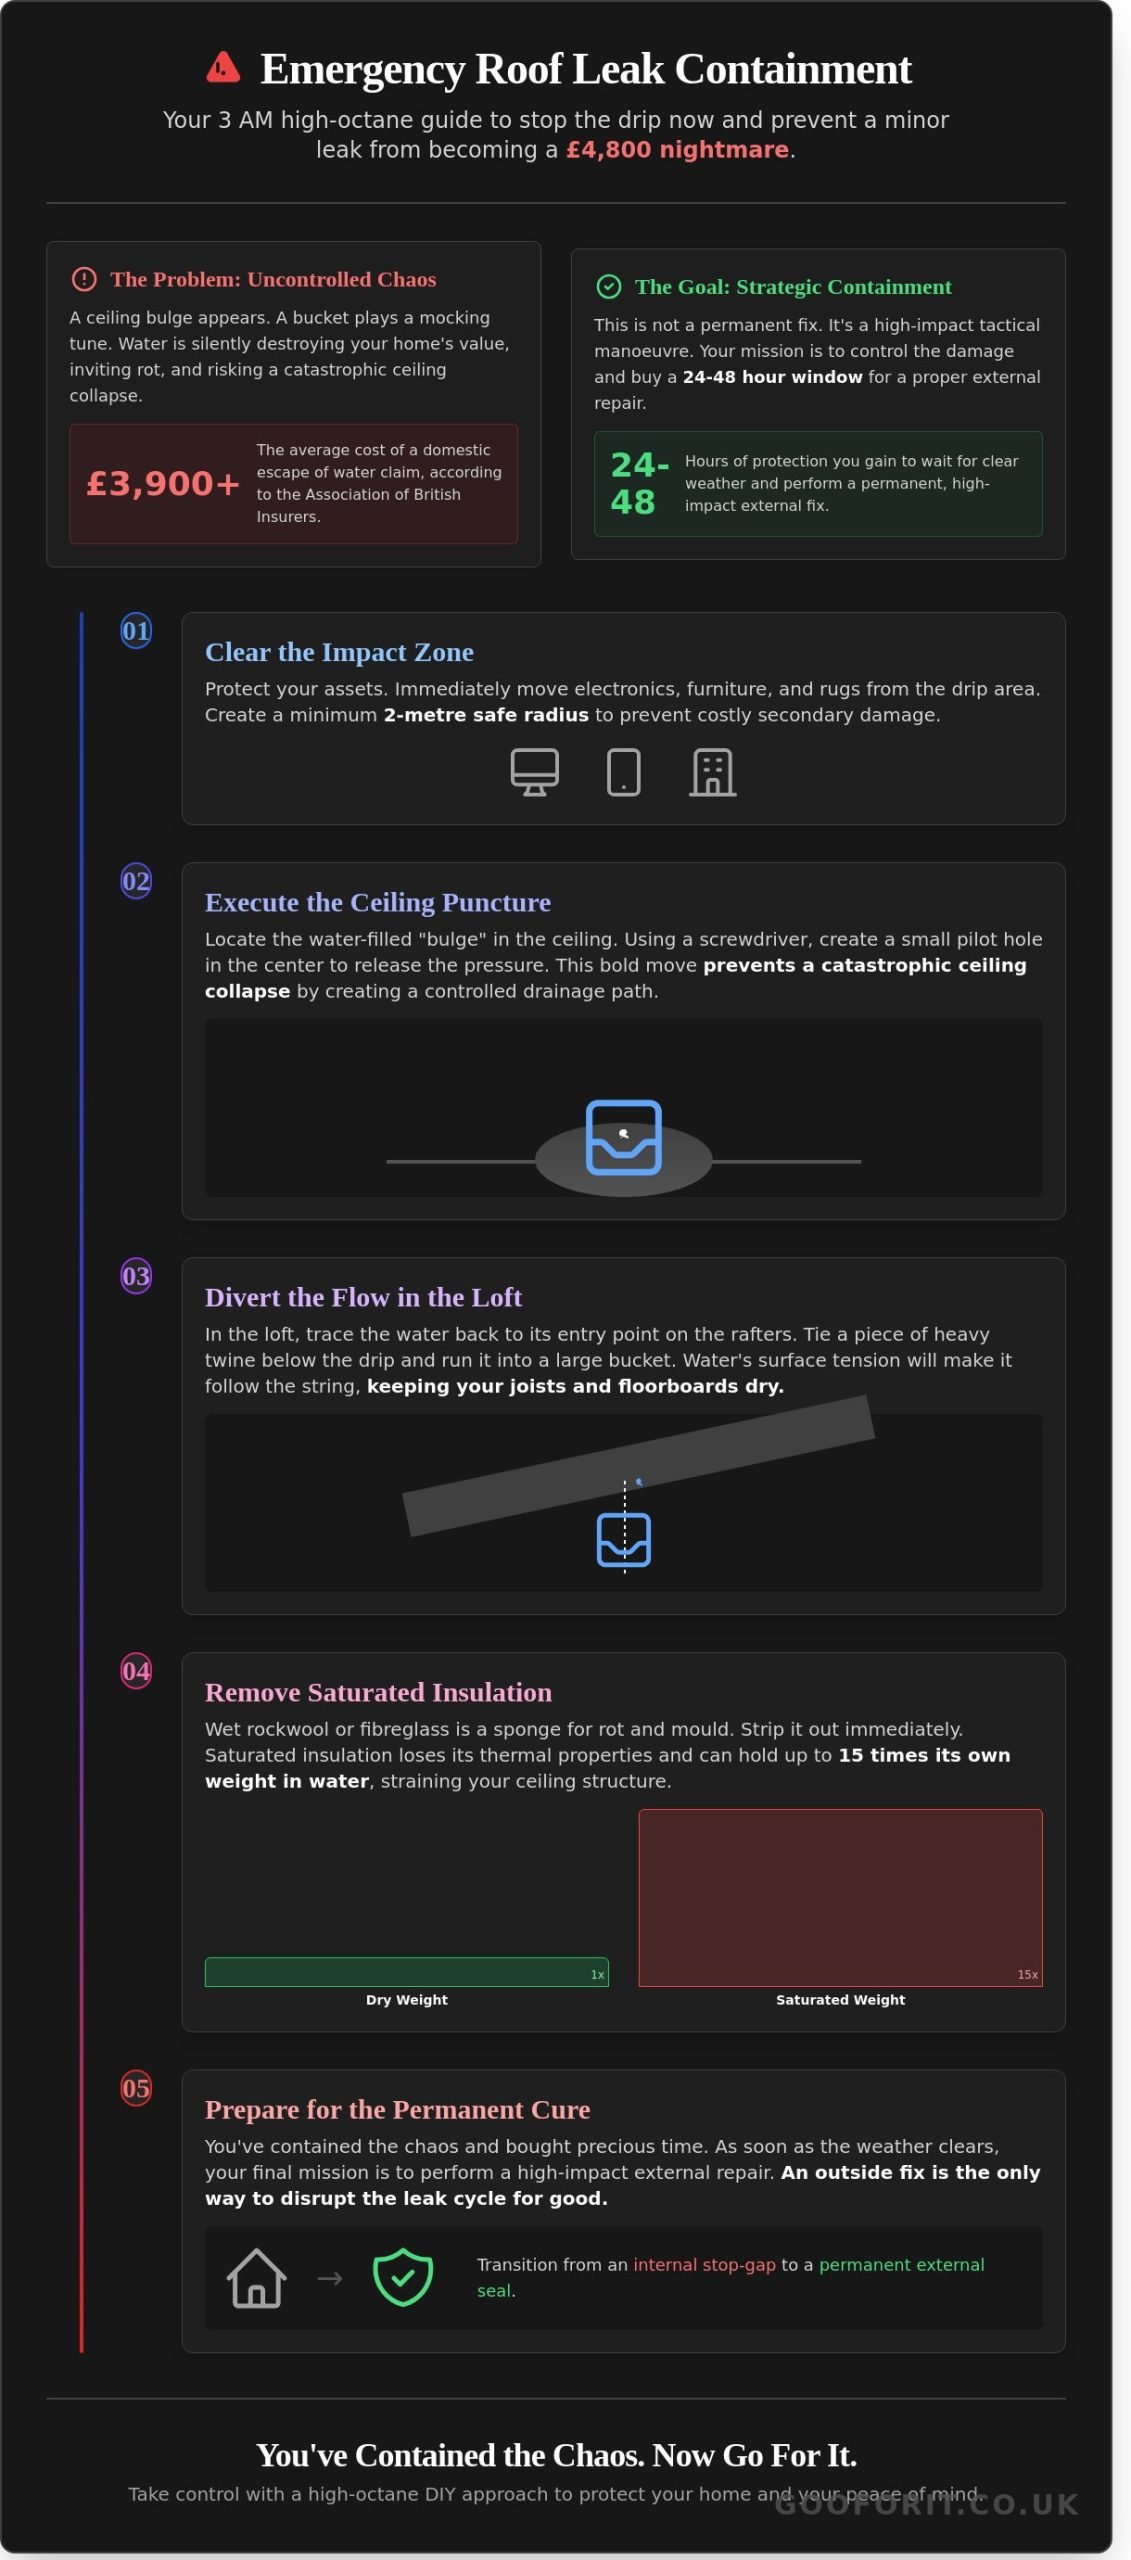
Emergency Damage Control: 5 Steps to Stop the Drip Now
Water doesn’t wait for an invite. When it starts breaching your sanctuary, you’re in a high-stakes race against gravity and rot. This isn’t the time for a casual cuppa; it’s time for high-octane containment. Your goal is simple. You need to stop leak in roof from inside before the structural integrity of your home takes a massive hit.
Start by clearing the impact zone. Move the tech, the rugs, and that £1,200 sofa. According to 2023 data from the Association of British Insurers, the average domestic escape of water claim has climbed to over £3,900. Don’t let your valuables become part of that statistic. Clear a 2-metre radius around the drip to protect your vibe and your wallet.
The Ceiling Puncture Technique
It sounds counterintuitive, but you need to stab your ceiling. Look for the “bulge” where water is pooling behind the plasterboard. That sag is a ticking time bomb. If you don’t intervene, the weight will eventually cause a catastrophic ceiling failure, turning a small repair into a massive renovation project.
Grab a screwdriver or a drill. Create a small pilot hole right in the centre of the dampest point. This creates a controlled drainage path. By directing the water into a single stream, you reduce the surface area of the damage and prevent the water from spreading horizontally across your joists. It’s a bold move that saves your structure. Once the flow is steady, you can focus on the next step of the Goo For It mindset: taking total control of the chaos.
Diverting the Flow in the Loft
If you have loft access, get up there with a torch. You need to find the entry point on the rafters. Water often travels down a beam before it drips, so the leak might not be directly above the ceiling spot. Use the string trick to manage the flow. Tie a piece of heavy twine around the leaking rafter and lead the other end into a bucket. The water will follow the string, keeping your floorboards dry.
- Manage the insulation: Wet rockwool is a sponge. It can hold 15 times its own weight in water. Strip it out immediately.
- Create a dry zone: Clear a 1-metre area around the leak to improve visibility and stop mould from colonising your loft.
- Use boards: Place a piece of plywood across the joists to support your bucket and prevent accidental foot-through-ceiling moments.
For a temporary internal shield, bitumastic tape is your best friend. This heavy-duty adhesive can be applied to the inside of the roof felt or sarking to redirect water. It isn’t a permanent cure, but it buys you 48 hours of breathing room while you wait for a professional. It’s about making noise and taking action when the pressure is on.
Tracing the Vibe: How to Hunt the Leak Source from Your Attic
Gravity is a liar. That drip hitting your bucket right now? It is rarely directly below the hole in your roof. Water is a traveler. It enters through a slipped tile, runs down the bitumen felt, and hitches a ride along a timber rafter before finally making its grand entrance into your living space. To effectively stop leak in roof from inside, you must become a tracker. You are hunting the source, not the symptom. This requires a shift in perspective. You are looking for the entry point where the weather disrupts your peace.
UK homes face a specific set of villains. Whether you are in a Victorian terrace or a 1970s detached, the culprits remain consistent. Based on common maintenance cycles, roofs over 25 years old are prime candidates for material fatigue. Look for these common UK issues:
- Slipped Welsh slates or clay tiles, common after high-wind events.
- Cracked bitumen felt in 1930s to 1950s properties that has become brittle with age.
- Perished GRP or EPDM membranes on modern flat-roof extensions.
- Degraded mortar on chimney flaunching or failed lead flashing.
Following the Moisture Trail
Kill the main lights. Grab a high-lumen torch. You are looking for the “shimmer.” During active rainfall, water on timber reflects light with a mirror-like finish. Track this shimmer “uphill” along the rafters. Pay close attention to the windward side of chimneys and vents. These are high-vibe areas for failure where flashing often gives way. Don’t waste energy on dry, brown stains. If it does not glint under your torch beam, it is an old scar. You are here for the active disruptors that need immediate noise.
The ‘Internal Marker’ Hack
Finding the entry point from the attic is only half the battle. Once you are actually on the roof, everything looks identical and the perspective shifts. Use a thin wire or a long nail to poke through the felt or sarking at the exact leak site. This is your beacon. It tells you exactly where to stop leak in roof from inside once the weather clears and you transition to external repairs. Wrap high-visibility tape around the rafter nearby to create a visual shout. This prep work ensures that the moment the clouds part, you can Go For It with total precision. No guessing. Just impact.
The Permanent Cure: Moving from Inside Patching to Outside Performance
Internal patches are a survival tactic. They keep your sofa dry tonight, but they won’t save your structure. To stop leak in roof from inside permanently, you must shift your focus to the exterior. Moisture trapped in roof decking can trigger structural rot in less than 72 hours. You need to disrupt this cycle before the damage becomes a £5,000 replacement bill. Surface preparation is the secret to a high-impact bond. Scrub away the moss. Clear the grit. A clean substrate ensures your coating fuses to the roof rather than sitting on top of the dirt.
Speed is everything when the clouds are grey. You’ve already identified the entry points from your internal hunt. Now, it’s time to seal the deal. Moving to the outside allows you to apply professional-grade barriers that resist the weight of standing water. This transition moves you from a defensive crouch to a position of total control. It’s about stopping the problem at the source before it ever has a chance to drip.
Instant Impact with SpeedPatch
Forget those messy bitumastic tins that take forever to dry and even longer to clean up. SpeedPatch technology changes the game. These UV-cured patches provide an immediate external seal that hardens in minutes. Simply peel, stick, and let the natural light do the work. They are perfect for sealing the cracks and holes you marked earlier. While traditional bitumen becomes brittle and cracks, these patches remain flexible. They move with your house. It is a surgical strike against water ingress that delivers instant results without the drama.
The Full Restoration Vibe
A patch fixes a hole, but a GRP Roof Restoration Coating protects your entire investment. This isn’t just a quick fix; it’s a total vibe shift for your property. Whether you have old felt, asbestos, or lead, GRP coatings create a monolithic seal. This is the ultimate way to stop leak in roof from inside by ensuring no water ever reaches the deck. It creates a waterproof shield that ignores internal pressure and thermal expansion. In the UK, where temperatures can swing 15 degrees in a single day, this flexibility is vital. You get long-term colour stability and fierce UV resistance that keeps your roof looking fresh and performing at its peak.
Stop playing catch-up with every rainstorm. Take the initiative and turn your temporary patch into a permanent fortress. It’s time to make some noise and show that leak who is boss. Go for it and upgrade your roof protection now.
Go For It: Disrupt the Leak Cycle with High-Octane DIY
Stop waiting for the roofer. That £200 call-out fee is money better spent on a permanent solution you control. When the rain starts hitting your floorboards, the standard corporate narrative tells you to wait. We say disrupt that cycle. Your home deserves immediate protection, and you have the power to deliver it. Taking control isn’t just about saving cash; it’s about the grit to handle your own business. It’s about making noise while others are silent.
The Goo For It philosophy is simple. We provide professional results for the fearless DIYer. We don’t do fluff. We don’t do “maybe.” We provide high-impact tools that turn a crisis into a win. Whether you need to stop leak in roof from inside or seal a massive crack on a flat roof, our kits are designed to vibrate with energy and efficiency. This is a high-octane partnership between our expertise and your action. We provide the gear; you provide the movement.
In the UK, over 1.5 million commercial and residential buildings still contain asbestos. Flat roofs are notorious for failing under the weight of a typical British winter. Our kits have become the favourite choice for UK asbestos and flat roof repairs because they actually work in our climate. We don’t wait for a heatwave that never comes. We fix it now. Join the movement. Save your roof. Make an impact today.
Why Goo For It Kits Win
- Everything in one box. Forget three separate trips to the hardware centre for brushes, rollers, or sealants. We pack every essential item so you can start the second the delivery arrives.
- UK Weather Ready. Our formulas are built for the British drizzle. They bond, they seal, and they last. We don’t design for California; we design for Cornwall and Cumbria.
- Panic to Production. Our step-by-step guidance strips away the fear. We turn your “stop leak in roof from inside” emergency into a streamlined production process.
Your Next Move
Don’t let the water win. If you’re dealing with specialist materials, check out our asbestos roof repair guide. It’s the bold homeowner’s roadmap to sealing leaks safely and effectively. Need a fast fix for an external crack? Grab a SpeedPatch for instant results that defy the elements.
This is your moment to lead. Don’t just patch a hole. Don’t just wait for a quote. Go For It. Take the vibe of your home back into your own hands. Fix the leak. Make some noise. Secure your future today.
Own the Aftermath: Disrupt the Drip
You’ve traced the vibe in the attic. You’ve contained the chaos. Now it’s time to make some noise. Knowing how to stop leak in roof from inside is your emergency superpower, but it’s not the final act. Patching from the rafters buys you vital time while the rain lashes down. The real win happens on the tiles. According to industry data from Checkatrade, neglecting a minor leak can lead to structural damage costs exceeding £5,000 if left to rot. Don’t wait for the next storm to test your luck. Use our specialist GRP formulations to create a seal that actually lasts. We offer rapid UK-wide delivery, bringing high-octane, pro-grade power straight to your doorstep. Our DIY-friendly ‘Go For It’ guidance ensures you’re never working in the dark. It’s about more than just staying dry; it’s about taking total control of your space. Grab your kit. Climb up. Change the narrative. You’ve got the vision. Now, make the impact.
Stop the drip for good-shop our Instant Repair Kits now!
Frequently Asked Questions
Can I use spray foam to stop a roof leak from the inside?
Don’t use spray foam. It’s a trap that seals moisture against your rafters and accelerates timber rot. The National Federation of Roofing Contractors (NFRC) warns that this creates a massive headache for future repairs. It’s messy and often makes a simple tile replacement impossible. Use a temporary patch to stop leak in roof from inside instead. Keep the structural vibe intact.
Is it safe to go into my loft while the roof is actively leaking?
You can enter the loft, but you must stay on the joists and avoid wet electrical cables. According to the Health and Safety Executive, falls from heights account for 25% of fatal workplace injuries. Domestic lofts are just as risky when surfaces are slick. Bring a powerful torch and move with purpose. Keep your focus on the task. Don’t let a small leak turn into a major accident.
How do I know if the leak is coming from the roof or a pipe?
Check the timing of the drip. If the leak only appears during heavy rainfall, it’s almost certainly the roof. If it’s constant regardless of weather, check your plumbing. Data from British insurance providers shows that 85% of mystery leaks in lofts involve failed flashing or slipped tiles. Turn off your stopcock to see if the flow stops. That’s your definitive answer.
What is the best temporary sealant for an internal roof leak?
Bitumen-based flashing tape or emergency roof mastic is your best bet for a quick result. These materials create an instant waterproof barrier even on damp surfaces. They work best when the temperature is above 5 degrees Celsius. This is the most effective way to stop leak in roof from inside while waiting for a professional roofer. Buy a 300ml tube of high-grade sealant for a fast, high-impact fix.
Can a roof leak stop on its own when the rain stops?
The water stops, but the problem doesn’t. Moisture vanishes when the sun comes out, but that hole is a ticking time bomb. Mould starts its impact within 24 to 48 hours of the first drip. Waiting for the next storm is just asking for a ceiling collapse. Don’t let the silence fool you. Get it sorted before the next downpour creates more noise.
Will my insurance cover a roof leak I tried to fix myself?
Your insurance might cover the damage, but they won’t pay for a botched DIY job. Most UK policies have a duty of care clause. If you cause more damage while trying to fix it, you’re on the hook for the bill. The Financial Ombudsman Service notes that lack of maintenance is a top reason for claim rejection. Document everything. Take photos before you touch anything.
How long can I leave a temporary internal fix before it causes rot?
You have roughly 48 hours before mould sets in and about 3 weeks before structural rot begins. Timber with a moisture content over 20% is a breeding ground for dry rot. That’s a high-stakes game you don’t want to play. Get a professional on-site within 7 days to ensure the vibe of your home stays dry and safe. Speed is everything here.