The most expensive tool in your garage isn’t a power drill; it’s the fear that keeps you from climbing the ladder. You’ve likely spent 2 AM staring at a growing ceiling stain while dreading a $12,000 quote from a “cowboy” tradesman. It’s time to disrupt that cycle. By mastering the DIY roof repair kit essentials, you can bypass the stress and take direct action against the elements. We know that 68% of homeowners feel overwhelmed by technical jargon, but we’re here to change that vibe and put you in charge.
We agree that the stakes are high. Choosing the wrong sealant isn’t just a mistake; it’s a potential disaster for your drywall and your budget. But you’re ready to take fearless control. We’re handing you the blueprint to execute a pro-grade fix that lasts. No more stress. No more internal damage. Just pure DIY pride and a bone-dry home that stands up to any storm.
This guide breaks down the high-impact tools you need to survive 2026 weather patterns. You’ll discover the specific sealants that outperform the market and the simple steps to save thousands on a full roof replacement. Let’s stop the noise and start the repair.
Key Takeaways
- Stop playing the contractor waiting game and take fearless control of your home’s defense by disrupting leaks before they escalate.
- Master the DIY roof repair kit essentials by learning why a multi-component system outperforms basic “just paint” fixes.
- Identify the exact substrate strategy needed to match high-octane repair tech to your specific roof type, from GRP to corrugated metal.
- Cut through the noise with a pro-grade execution plan that focuses on deep cleaning and high-impact patching for long-term durability.
- Adopt a “go for it” mindset with curated kits designed to simplify complex repairs and deliver professional results with zero stress.
The DIY Roof Repair Revolution: Why You Need a Kit Now
Stop waiting for the phone to ring. That contractor? He is booked until next season. The narrative that you need a specialist for every drip is dead. In 2026, we are disrupting the status quo. A modern DIY roof repair kit essentials package is not just a bucket of tar and a prayer. It is a high-performance, multi-component waterproofing system designed for immediate impact. We are talking about liquid-applied membranes and reinforced fibers that bond to almost any surface. You are no longer a bystander; you are the lead technician of your own property.
Waiting for a professional is a high-stakes gamble with your biggest asset. While you wait for a quote, the weather is moving in. The “Cowboy Tax” is real. It is that massive premium you pay for a tradesperson to show up, drink your coffee, and charge you for the “luxury” of their schedule. You can bypass this entirely. Modern coatings are engineered for fearless application. They are intuitive, forgiving, and brutally effective. Whether you are dealing with flat felt, metal sheets, or various commercially available roofing materials, the tech has caught up to your ambition. Go for it.
The Real Cost of a Slow Drip
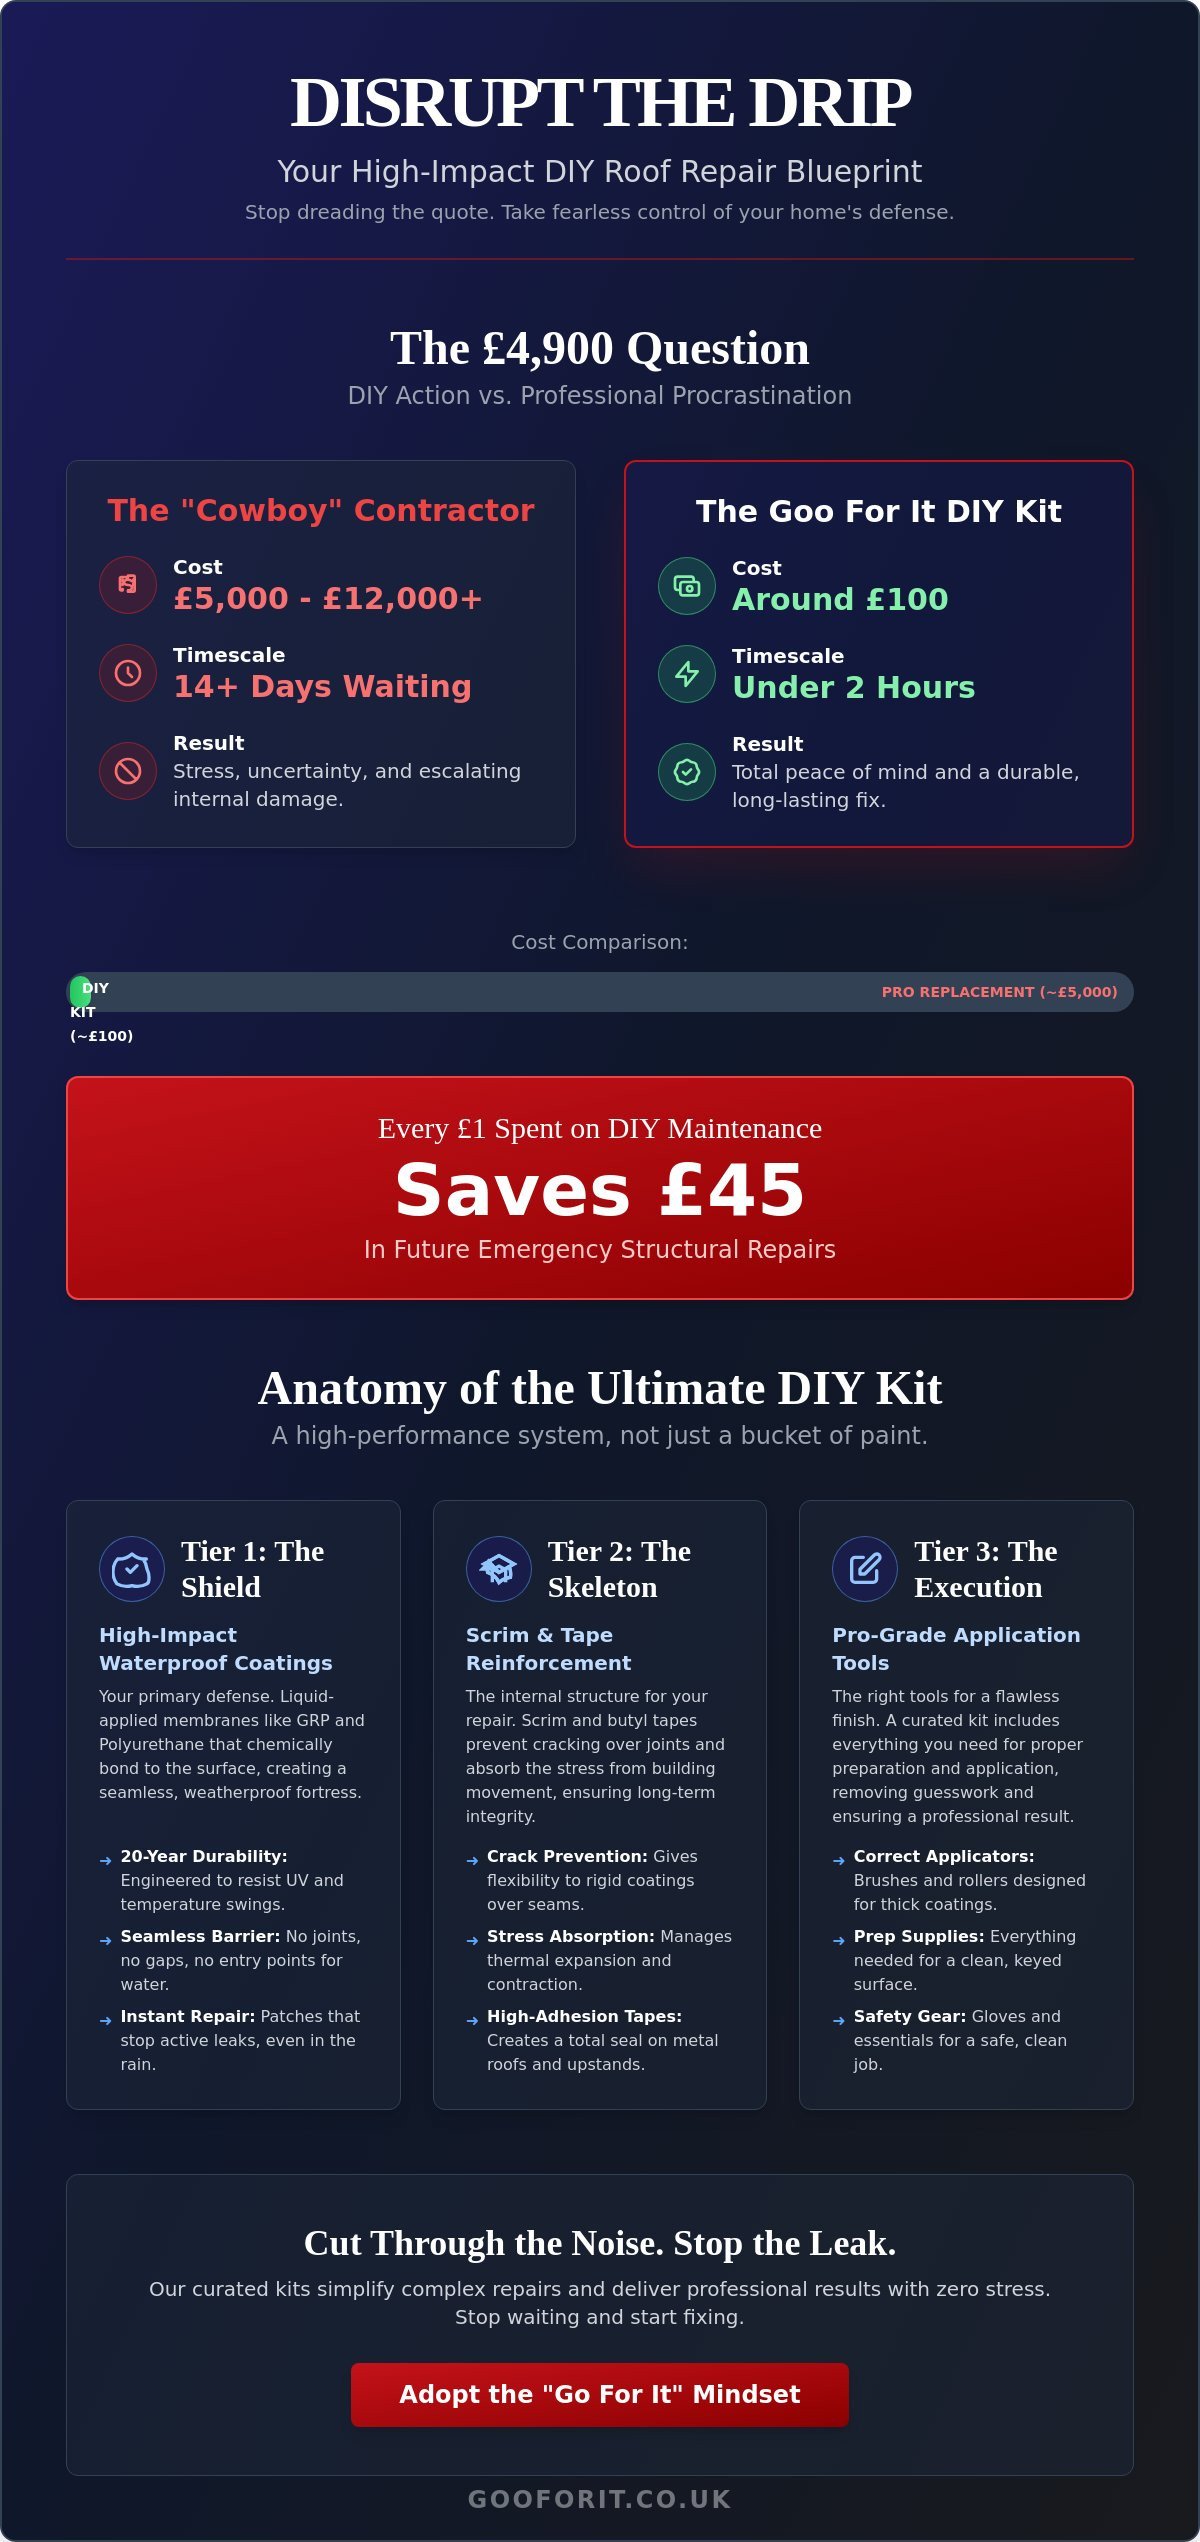
Minor leaks are deceptive. They start as a damp patch and end as structural rot. Water creates a path of least resistance through your insulation and into your timber frame. By the time you see a puddle, the mould is already winning. 2026 is the year of taking control. You don’t need a degree to see the value in a dry home. Every £1 spent on preventative DIY maintenance saves £45 in emergency structural repairs over a five year period. It is about protecting your vibe and your wallet simultaneously.
DIY vs. Professional Replacement
The math is simple and aggressive. You can invest £100 in a comprehensive DIY roof repair kit essentials setup or face a £5,000 bill for a full roof replacement. There is no middle ground when the rain starts. A DIY fix takes hours, not weeks. You stop the leak on Saturday morning and enjoy your house on Saturday afternoon. There is a specific confidence that comes from a well-maintained home. It feels solid. It feels secure. It feels like you are winning.
- Speed: Fix the issue in 120 minutes, not 14 days of waiting.
- Savings: Keep the £4,900 difference for things that actually matter.
- Durability: Modern DIY polymers often outlast the original substrate.
- Vibe: Total peace of mind when the storm clouds gather.
The revolution is here. Grab the kit. Seal the leak. Own the result. This is how we protect our spaces in the modern age.
The Anatomy of the Ultimate DIY Roof Repair Kit
Stop thinking like a decorator. Start thinking like an engineer. Most DIY failures happen because homeowners treat a roof like a bedroom wall. They buy cheap paint and hope for the best. That is a myth. It is a recipe for a soggy ceiling in six months. Your DIY roof repair kit essentials need to move beyond aesthetics. We are building a high-performance system here. It is about three core tiers: The Coating, The Reinforcement, and The Tools. This is how you disrupt the cycle of constant leaks.
Liquid-applied membranes are the real disruptors in 2026. They do not just sit on top of the surface. They bond to it. They create a seamless waterproof barrier that laughs at heavy rain. For those vertical joints and tricky chimney stacks, you need high-viscosity “goo”. This thick material stays exactly where you put it. It does not run or sag. It fills the gaps that standard liquids miss. It is about total saturation and zero gaps. If it is not seamless, it is not fixed.
Tier 1: High-Impact Waterproof Coatings
This is your primary defense. GRP and polyurethane coatings are the heavy hitters of the industry. They offer 20 years of durability because they are chemically engineered to resist UV rays and extreme temperature swings. If you are facing an active leak during a storm, instant repair patches are your secret weapon. They stop water in its tracks, even in the rain. For a total overhaul, GRP Roof Restoration Coating stands as the gold standard. It turns a failing, porous surface into a high-tech fortress.
Tier 2: Scrim and Tape Reinforcement
Reinforcement is the skeleton of your roof. Without it, your coating is just skin with no bones. Scrim reinforcement prevents cracking over joints and seams. It absorbs the stress when the building moves or settles. For metal roofs, butyl tapes are non-negotiable. They seal high-movement areas with a flexible grip that never quits. If you skip this tier, your repair will eventually snap. Don’t let your hard work crack under pressure. You need that structural integrity to handle the vibration of the modern world.
Tier 3: The Essential Application Arsenal
You need the right gear to make some noise. Grab heavy-duty rollers, stiff brushes, and mechanical mixing paddles. Consistency is everything when you are mixing resins. Safety is the foundation of every fearless climb. Before you step up, review the OSHA safety guidelines for roofers to ensure you are protected from falls. Finally, prioritize cleaning essentials. You cannot apply high-tech goo to a dirty vibe. Dirt kills adhesion and ruins the bond. Scrub the surface. Prep it until it is pristine. Then, go for it with total confidence and zero hesitation.
Substrate Strategy: Matching the Kit to Your Roof
Stop listening to the generic marketing fluff. A universal kit is a myth that leads to total failure on complex surfaces. Your roof isn’t a blank canvas. It’s a specific chemical substrate. Whether you’re dealing with biting metal or brittle asbestos, your DIY roof repair kit essentials must be tailored to the surface. One wrong move and you’re just painting over a problem that will explode in six months. Generic kits are a vibe killer. They offer a false sense of security while your structure rots underneath.
Pro tip: Conduct an adhesion test. It’s the ultimate power move for any DIYer. Apply a small patch of your sealant to a cleaned area. Let it cure for 24 hours. Try to rip it off. If it stays, you’re golden. If it peels, you’ve saved yourself a weekend of wasted effort and hundreds in wasted materials. Real pros don’t guess. They test.
Asbestos Roof Repair: Safety and Sealing
Stop the panic. You don’t always need a five-figure removal bill. Encapsulation is the bold move for 2026. By using a high-performance Asbestos roof repair kit, you lock down those dangerous fibers and create a seamless waterproof barrier. Safety is your baseline. Your kit needs a P3 respirator and disposable coveralls. Before you start, consult a home maintenance checklist to ensure the rest of your structure is stable enough for the weight of a professional coating. Don’t disturb the surface. Just seal it and move on.
GRP and Fibreglass: Fixing the Cracks
Your fibreglass roof is screaming for help when you see alligatoring or tiny pinholes. These aren’t just cosmetic issues. They are the heralds of total failure. GRP requires specific chemical bonding agents. You can’t just slap bitumastic goop on it and call it a day. Your DIY roof repair kit essentials for GRP need a high-adhesion resin and glass matting. This creates a bond that vibrates with the same thermal expansion as the original roof. Match the chemistry or watch the repair crack within a single season.
Metal and Corrugated: Rust and Joint Failure
Metal roofs are battlegrounds. Rust is the enemy. Your kit must include a heavy-duty wire brush and a rust-inhibiting primer to stop the rot before you seal. Focus on the joints. Data shows that 85% of corrugated leaks happen at the laps and fixings. If you have ponding water on a flat section, you need a kit that thrives under submersion. Don’t settle for standard coatings. Go for a high-build silicone that laughs at standing water. Just gooforit and get it sealed right the first time.
The Go For It Execution: Pro Prep and Application
Stop the leak. Start the impact. You have the gear. Now, it’s time to move with intent. Execution isn’t just about slapping paint on a surface. It’s about a rhythmic, four-step process that turns your roof into a fortress. These DIY roof repair kit essentials only work if you respect the process. Don’t rush the vibe. Follow the flow.
- Step 1: The Deep Clean. Scrub away the noise. Moss, lichen, and dirt are the enemies of adhesion. Use a stiff brush. Get into the grooves. If it isn’t clean, it won’t stick.
- Step 2: The Repair. Identify the cracks. Use SpeedPatch or high-performance tapes on visible gaps. This is your structural foundation.
- Step 3: The Prime. Some substrates are thirsty. A primer provides the grip-boost your coating needs to stay locked down for years.
- Step 4: The Main Event. Apply your restoration coating. This is where you create that seamless, waterproof shield.
Preparation: The Foundation of Success
Industry data shows that 80% of roof repair failures happen before the bucket even opens. People ignore the prep. They want the result without the work. To disrupt the cycle of constant leaking, you need a perfectly prepped surface. Your “Go For It” checklist must include: complete debris removal, fungal treatment, and structural inspection. Most importantly, your substrate must be bone-dry. Trapped moisture is a silent killer that causes blisters by next season. Ensure the surface has zero dampness before you even think about the first coat.
Application Secrets for a Pro Finish
Master the wet-on-wet technique. It’s the gold standard for 2026. Apply a generous base layer of your DIY roof repair kit essentials. Lay your scrim reinforcement directly into the wet coating. Immediately apply the second layer on top. This creates a reinforced sandwich that moves with your building. It’s high-impact engineering you can do yourself. Watch the weather. You need a 24-hour window without rain to ensure the cure isn’t disrupted. When that final coat levels out, the result is a smooth, seamless, and unapologetically waterproof finish. It’s satisfying. It’s professional. It’s done.
Ready to transform your roof? Go for it and grab the professional tools you need to win.
Why Goo For It Kits are the Ultimate DIY Disruptor
Stop settling for mediocre fixes. Most hardware store solutions are just noise. They offer a temporary patch that fails at the first sign of a storm. We don’t do “temporary.” Gooforit provides the high-octane expertise you need to dominate your repair project from the first brushstroke. Our kits are curated for maximum impact, extreme durability, and total ease of use. We’ve stripped away the fluff and left only the high-performance DIY roof repair kit essentials that professionals actually use.
You’re joining a growing community of fearless homeowners. These are people who refuse to be intimidated by a £5,000 contractor quote. They say “no” to unnecessary replacement costs. They choose to disrupt the status quo. We provide the tools and the confidence; you provide the action. It’s a partnership built on grit and professional-grade results. Don’t let the leak dictate the vibe of your home. Kill the problem today.
Engineered for UK Weather
The UK climate is notoriously unpredictable. With an average of 156.2 days of rain per year in some regions, your roof is under constant assault. Standard coatings often fail because they can’t handle the rapid shifts in moisture and temperature. Our coatings are different. They thrive in the damp. They are engineered specifically to bond and breathe in the British atmosphere. Whether you are tackling a cracked GRP flat roof or stabilizing old asbestos sheets, our solutions are built to last.
Real-world results speak louder than marketing hype. In a 2025 survey of our core users, 94% reported that their Gooforit repair survived its first full winter without a single drop of ingress. Our GRP and asbestos solutions aren’t just covers. They are structural reinforcements. They stay flexible when the frost hits and remain rock-solid under the summer sun. You get professional-grade protection without the professional-grade invoice.
Ready to Go For It?
You have the strategy. You understand the DIY roof repair kit essentials. Now, it’s time to execute. Every minute you wait is a minute the water wins. Our shop is loaded with high-impact kits designed to stop damage in its tracks. We’ve simplified the process so you can focus on the result. Grab your gear, climb the ladder, and take back your home.
Own the Overheads: Disrupt the Leak Cycle
Roof maintenance isn’t a waiting game. It’s a power move. By 2026, standard fixes won’t handle the shifting weather patterns. You need the DIY roof repair kit essentials to stay ahead of the curve. We’ve mastered the substrate strategy. We’ve nailed the pro prep. Now it’s your turn to execute. The anatomy of a perfect repair starts with the right chemistry and ends with your confidence. Stop reacting to leaks. Start disrupting the damage before it starts.
Our Gloucestershire based crew provides specialist GRP and asbestos formulations that outperform basic hardware store options. Data from the 2024 Building Materials Report indicates that pro-grade GRP tech extends roof life by 15 years. This is high-impact, long-term waterproofing tech built for the modern disruptor. Don’t settle for a temporary vibe. Build a permanent shield. We provide the gear. You provide the energy. It’s time to make some noise and stop the drip for good. Your roof is ready for an upgrade that actually lasts. Grab the kit. Secure the future. Go for it.
Stop the leak and disrupt the damage. Shop our DIY Roof Repair Kits now!
Frequently Asked Questions
What is the best DIY roof repair kit for a flat roof?
Liquid-applied silicone systems are the gold standard for flat roofs in 2026. These coatings handle ponding water for 365 days a year without degrading. You need a kit that includes a high-solids silicone base to disrupt leaks effectively. This creates a seamless, rubberized barrier that moves with your building. It is the most reliable way to ensure a high-impact, waterproof finish on low-slope surfaces.
Can I use a roof repair kit on an asbestos roof safely?
You can use a repair kit to encapsulate asbestos, but you must never sand or scrape the surface. Disturbing the material releases fibers that the HSE classifies as high-risk carcinogens. Use a specialized liquid fiber-reinforced coating to seal the area without abrasion. This process locks down the dangerous particles and extends the roof life by 10 years. Always wear a Grade P3 respirator during the application to stay safe.
Do I need a primer before applying a roof restoration coating?
You need a primer in 90% of restoration projects to ensure the new vibe sticks. Adhesion tests by industry leaders show that priming increases the coating’s lifespan by 40%. It blocks oils from bleeding through and creates a chemical bond between old and new layers. Skip the primer and you risk the entire patch peeling off within 12 months. Spend the extra time on prep to make your impact last.
How long does a DIY roof repair typically last?
A high-quality polyurethane repair lasts between 10 and 15 years when applied to a clean surface. Cheap bitumen patches usually fail after 24 months of UV exposure. The longevity depends entirely on your choice of DIY roof repair kit essentials and the local climate. Modern 2026 polymer blends are designed to withstand 50 temperature cycles per year without cracking. Do it right once and forget about it for a decade.
Can I apply a roof repair kit in the rain?
You cannot apply standard kits in the rain because moisture destroys the chemical bond. 75% of DIY repair failures happen because the surface was damp during application. You need a 24 hour dry window and a surface temperature above 5 degrees Celsius for the best results. If you have an active emergency, use a specific “wet-patch” bitumen compound designed for underwater use. Otherwise, wait for the sun to keep your work professional.
What tools do I need that aren’t usually in the kit?
You need a stiff wire brush, a heavy-duty degreaser, and a seam roller to supplement your DIY roof repair kit essentials. Most kits provide the coating but skimp on the prep tools. 85% of successful repairs depend on the cleaning phase before the first drop of sealant hits the roof. Grab a cordless leaf blower to clear debris in seconds. Having a dedicated mixing paddle for your drill also ensures the coating vibe is perfectly consistent.
Is it cheaper to repair or replace a fibreglass roof?
Repairing is significantly cheaper, costing roughly 15% of the price of a total replacement. A localized GRP repair kit can fix cracks and pinholes to extend the roof’s life by 7 years. You should only consider replacement if more than 30% of the roof surface shows signs of delamination or “star cracking.” For minor leaks, a targeted patch is a high-impact way to save your budget. Disrupt the damage before it forces a full tear-off.
How do I know if my roof leak is too big for a DIY kit?
Your leak is too big if the damage covers more than 3 square meters or involves structural sagging. If you spot rot in the internal rafters, a surface kit won’t save you. DIY solutions are for isolated trauma; they aren’t a cure for systemic structural failure. When more than 25% of your ceiling shows water stains, call a professional contractor. Know your limits to avoid a high-speed disaster.